I about had a stroke last night in the produce section of our local grocery store—right in front of the iceberg lettuce! The heads were small and misshapen and almost $3 each. The romaine lettuce was almost $8 for three heads in a plastic zip top bag. I turned to my daughter and said, “NO WAY!”
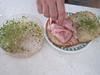
This is the time of the year when we really get serious about sprouting. We use sprouts to replace some of the lettuce in salad and as a substitute for it on sandwiches and in roll ups.
Sprouting has many advantages:
· Sprouting seed costs very little per ounce for the amount of food that it turns into within a few days of germination. (You can be eating sprouts in as little as 3-7 days.)
· It is one of your best fresh/live food values. (I bought raw organic hulless sunflower seed yesterday for 74 cents a pound, and it only takes two tablespoons per sprouting tray.)
· Sprouts are full of vitamins and minerals.
· Food just doesn’t come any fresher or more local.
· The seed stores well and doesn’t take up much space. All you need is a clean container and a dark, dry, cool pantry or kitchen cabinet to store them.
My mom started sprouting alfalfa seeds in the 1970s. She used Mason jars with screen lids and used the resulting sprouts in salads. She also experimented with other mixtures of seed. She would soak the seeds in warm water in the jar for a while and then drain away the water through the mesh lid. Every day afterward, she would rinse the seeds in the morning and evening. After they germinated, the rinsing would carry away the hulls. Eventually, she would have a jar full of tangled sprouts. She kept the sprouting jars on their sides under the kitchen sink during this process.
There are many more complex contraptions today for sprouting, and they can be quite expensive. The jar and screen lid method is still one of the cheapest around. I’ve tried various styles of sprouting and have settled on a couple that are quick, easy, and meet my family’s needs.
I use a stacked siphon sprouter (Bioset Kitchen Salad Garden) most of the time. This sprouter works well for small as well as large seeds. It has a top tray with a siphon that drops water down into the next tray and so on through three trays and finally into a bottom reservoir. When all the water has drained to this bottom tray, I empty it and that is it. I make it part of my morning and evening routine and always keep the sprouter out on my kitchen counter next to the radio. (If you pack the sprouter away, you probably won’t get it out and use it.)
I also have a simple tray-style sprouter in which the rinse water drops straight through that works better for sunflower seeds and larger seeds. I find I have to rinse more often with this sprouter so the sprouts don’t dry out.
Johnny’s Seed ( www.johnnyseeds.com ) sells the Bioset sprouter and a selection of sprouting seeds. Many other seed companies sell sprouting seeds and sprouters, including Jung ( www.jungseed.com ), Thompson & Morgan ( www.tmseeds.com ), and R.H. Shumway ( www.rhshumway.com ) to name only a few. Thompson & Morgan and Johnny’s have the widest selection of sprouting seed, but R.H. Shumway has some of the lowest prices. I have also bought sprouting seed at bulk and natural food stores. The advantage of these stores is that you don’t have to pay postage!
Give sprouting a try. At the price of lettuce and other fresh vegetables right now, you could buy a sprouter and some seed for the price of one trip the grocery store produce section! Begonia
I love the smell when I am peeling an orange. Most of the time I cut them into slices for easier eating, and the peel goes into the compost pail when the meal is over. Sometimes when we need a quick snack on the go, we just take the whole orange and peel it in the car or when we get to our destination, and the peel goes in the trash if I don’t pack it home and throw it on the compost pile on the way into the house.
Years ago when oranges were precious treats eaten only at Christmas time, many mothers would confiscate the peels and use them in baking or to make into that delicacy, candied orange peel. http://candy.about.com/od/fruitcandy/r/candied_peel.htm
I think that fresh or frozen orange peel gives the best flavor to baked goods, so I try to have a small supply of it in the freezer at all times! Whenever I buy oranges I use my potato peeler to scrape the orange layer of the peel from one or two fruits after I have washed them with a dab of Dawn liquid dishwashing soap. Be sure to rinse all of the detergent off after you are done sudsing the fruit! (If you are worried about pesticide residue, buy organic fruit, but still be sure to wash the fruit well before peeling.) This method can also be used to save lemon and lime peel.
I place the citrus peels in a small tightly sealed plastic bag or container and store in the freezer. I have also stored them in the freezer wrapped tightly in foil. They freeze well, but beware of freezer burn. If the peels get too frosty, start over with a new batch.
Next time you eat an orange, don’t throw out all the peel—freeze some to use later! Begonia
I probably should have posted this before Thanksgiving, when many people were cooking a whole bird and throwing away one of the best parts! Oh well, you can always redeem yourself with the Christmas turkey.
When preparing your bird for roasting, be sure to save and freeze the neck if you aren’t going to use it right away for broth to make gravy. Set aside the carcass of the turkey, including bones from the drumsticks, wings, and thighs after carving. (Don’t save any bones from parts of the turkey that people have put in their mouths. Cooking with bones that people have slurped all over is both gross and disturbing—even though you will be boiling the bejeebers out of them. That’s my opinion, but it is your call!) I throw away the fat, tail, and skin because I like a leaner broth. (You can put the carcass in a large plastic bag and freeze until you are ready to make broth if you don’t have time to make it the same day.)
Put the carcass and neck into a big pot when you are ready to make broth. Cut into large pieces and add:
3 large onions
5 or 6 stems of celery
2 large carrots
6 or more whole peppercorns
A generous handful each of parsley and sage
Cover the contents of the pot with one to two inches of water and bring to a boil. Simmer until the carcass falls apart. Add water as needed to cover carcass as it cooks.
Remove most of bones and vegetables with a slotted spoon and pour the broth and what solids remain through a strainer or cheese cloth. I use a wire strainer, but if you want a clear broth, line the strainer with cheese cloth. Throw away the bones and spent vegetables and herbs—all of their goodness is now in the broth and they are pretty much mush.
My broth usually doesn’t have enough fat in it to worry about because I discard the skin, tail, and visible fat while carving the turkey, but sometimes it is necessary to remove fat. You have several options:
Chill the broth and scrape the fat off once it rises to the top and solidifies.
Skim with a spoon and then drop paper towels onto the surface of the broth to absorb the last of the fat.
For small amounts of broth, use a fat separator pitcher to drain broth from underneath the fat that has risen to the surface.
You now have broth to make soup, gravy, or sauce or with which to cook rice, vegetables, or potatoes. You will note that I didn’t add salt when creating the broth because I use it for so many different purposes. (I add differing amounts of salt depending on the dish.)
You can use the broth right away, refrigerate it for a couple of days, or freeze it for months until you need it. I usually freeze my broth in 2-cup and 2-quart batches because these are the most common quantities needed for my favorite recipes.
You can use this method of making broth with chicken and beef, too. There is nothing nicer than the smell and taste of a good bowl of homemade broth in the winter. Begonia
I picked up a Back to Basics manual grain mill at a garage sale a few years ago that someone had bought as preparation for the year 2000. It was new in the box and cost me $5. I took it home, put it on a shelf in my pantry, and forgot about it.
I remembered the little grain mill while in my favorite bulk food store. I picked up a bag of wheat berries and thought, “I’ve got a grain mill I’ve never tried out!” I bought a bag of wheat, took it home, put it on a shelf in my pantry, and forgot aboutit!
I was sitting in my recliner with my breakfast coffee and a boring bowl of cold cereal and thought “Wouldn’t a bowl of hot cereal other than oatmeal or Coco Wheats be a nice change? “
And then I remembered! I got the grain mill out, retrieved the bag of wheat from the pantry, and started experimenting.
I found that I could get several grinds from the very simple mill depending on how tightly I screwed down the handle. I can make cracked wheat for bread, a finer grind for farina breakfast cereal, or a border-line coarse flour for whole wheat bread (it took a while to grind enough flour for bread with the little mill).
I’m usually not a fan of plain farina or “Cream of Wheat” hot cereal, but I found that the fresh wheat made a superior product to what I have bought from the grocery store. I added cinnamon to one batch and it smelled and tasted wonderful.
I prepared the cereal by bringing ¾ cup (6 oz.) water with a pinch of salt to a boil and sprinkling three tablespoons of farina into the boiling water while stirring constantly. Then I turned the heat down and continued to stir and cook for one or two minutes until the mixture thickened. I then took the pot off the heat, covered it, and let it sit for a few minutes covered and allowed it to thicken some more. Finally, I transferred the cooked cereal to a warm bowl with brown sugar, a little butter, and milk or half and half.
When properly stored in a cool, dry place, wheat keeps well for a year or more. When it is ground, it has a short shelf life before it begins to go stale (the wheat flour from the store has a stronger taste for this reason) because of the oil in the wheat germ. I freeze what flour or farina I have left over from each grinding for this reason.
If you get really serious about grinding all your own flour, you will probably want to buy a bigger hand or electric mill. For now, I’m just dabbling and will stick with my little one! Begonia
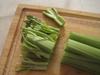
There was a great sale on celery at the grocery store this week. (Celery is in season right now.) I love to shop for food near the Thanksgiving, Christmas, and Easter holidays because there are so many great deals on beef, ham, and turkey and the different vegetables and canned goods that go into preparing the feasts for these holidays.
One of my pet peeves is waste. It is part of the reason that I junk pick, give stuff away, reuse things, and wear things out.
One sore spot for me is our almost criminal waste of our vegetable resources! I’ve watched people cut off and throw away the ends of celery—the part where the stems branch and above. (Yes, Earth Shaking isn’t it?!) The leaves are the best part for making stock and are also good in a green salad. (You can actually grow Cutting Celery that you only use to make stock or dry to make celery flavoring!) The branching stems also can be sliced or chopped and used like any other part of the celery.
The center(that tight little cluster of tender leaves and stems)of the celery stalk, another part I have seen people discard, is the most wonderful part of the whole vegetable. Use it as a garnish, in relish trays, chopped and added to salads, or in any other dish requiring celery.
You may think that I’m crazed for ranting about celery ends and what to do with them, but if I won’t, who will? We all pay too much for food to throw it away. Begonia
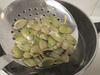
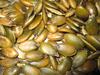
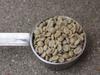
A friend of mine was experimenting with new cultivars and grew pie pumpkins with hulless seeds called Snack Face ( http://www.jungseed.com/dp.asp?pID=03285 ) this year. I'll be trying a few hills of these little beauties in my front yard next season! The seed, indeed, was hulless and very strange looking. I am used to the usual pumpkin seeds with their leathery white hulls. These seeds were a funny black green when raw and a brown green color when boiled, baked, and ready to eat.
I started out by cleaning the pumpkin like any other hard winter squash:
1. Scrub the shell of the pumpkin with a few drops of dishwashing liquid and rinse well.
2. Cut the pumpkin in half with a big knife.
3. Scoop out seeds with a spoon and by combing your fingers through the stringy guts! Discard guts (or compost or feed to your chickens!).
Then I cleaned and cooked the seeds:
1. Place seeds in a colander and rinse, picking out any stray clumps of fibrous “guts.”
2. Dump seed into a sauce pan and cover with a couple inches of water and a tablespoon of salt.
3. Bring to a boil and then simmer for 15 minutes.
4. Dump water and seeds in the colander again—DO NOT rinse—and drain off all excess water.
5. Spread damp seeds evenly in one layer in a shallow baking pan.
6. Bake at 350°F for 30 minutes or until crisp and dry when cooled, stirring every 10 minutes to prevent burning.
The neat thing about this cultivar is that it is also a pie pumpkin. The walls of the pumpkin are thin when compared to other pie varieties, but the flesh is as sweet as a winter squash and a bit less fibrous than a pie pumpkin. Both the seeds and the flesh taste wonderful. (For cooking instructions, see my November 14 blog, Eating in Season: Winter Squash.) If you enjoy growing pumpkins and squash, this would be a good variety to try. Begonia
We had our first little bit of snow yesterday. I’m not too happy about it because my chickens are molting, and this means keeping them inside with the heat emitter plugged in! When I woke up this morning, everything was covered thickly with frost. The roofs of the houses around us were white. It looked like snow!
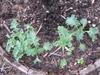
One of the first things I noticed were the leaf patterns of frost on the top of my van parked below my window in the driveway. Then I began to think about my greens. I planted kale, garden cress, and maches of three varieties in some of the barrel planters in the front yard. I had read that maches, kale, and garden cress—the maches in particular could freeze, and if left to thaw in place, would be perfectly fine for picking later in the day.
You know what? It’s true.
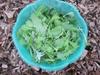
I just picked a salad that I will serve with supper tonight from my front yard garden and the cold frame—in November after lots of frost and a little snow. (I planted in September.) My goal is to still be harvesting by Christmas. There is a guy in Dubuque, Iowa, who served a fresh salad of greens from his cold frame every Christmas. He was featured in the paper every year we lived there, grinning for the camera and holding open a cold frame filled with greens among the snow drifts.
That is my goal for this year—Christmas Salad from My Little Farm in Town. Begonia
I’ve been cooking up all the squash I’ve been accumulating for the last few months. (I ran across a great deal on butternut squash—3 for $1.) I needed the floor space! Winter squash like pumpkins, butternut, and acorn, once field hardened (allowed to dry for a while outside so that their skins become hardened and so resist bruising), can store well for a long time at room temperature with low humidity. Some squash have a longer storage life than others. Pumpkins and butternut squash will keep all winter if their skins are not bruised or broken, while acorn squash must be eaten within a much shorter time or they begin to decay.
The flesh of some squash is finer grained, such as butternut and buttercup, and better for use in pie and casserole recipes. Other squash, such as the spaghetti or acorn squash, have a more fibrous consistency and are best eaten stuffed or with butter and brown sugar right out of their shells.
The easiest way to cook a squash is to bake it, but there are a few things you need to do before you pop it in your oven.
1. Wash the outer shell of the squash with a brush and a few drops of liquid dish soap and rinse well.
2. Cut the squash in half right down the middle with a big knife. I have a special tool that I slip over the knife blade that allows me to bear down on the pointy end of the knife safely. Some squash needs to be cracked open with a chisel or an ax—I use this method with big Hubbard squash.
3. Scoop out the “guts” and seeds. I use an ice cream scoop.
4. Place cavity downward on a shallow greased pan.
Bake in a medium oven (350°F) for 30 minutes or until a fork pushes easily through the shell and flesh.
Allow the squash to cool and then scoop the cooked flesh out of the shell in chunks and pack into freezer containers or bags.
You can use the cooked squash right away or it keeps well in the freezer until you need a pick-me-up later in the winter. Squash are rich in beta carotene and are very good for you! Enjoy. Begonia
Years ago, a gal who had worked in several small, excellent processing plants in Iowa—where they really know how to cut meat—guided me through the process of buying beef in bulk. Even small meat processing plants in Iowa turn out wonderful cuts of meat. I bought my first beef in this fashion when we lived in Iowa. Iowa is the land of row crops and meat with a capital “M”. Cuts that you find in the special meat case in a Wisconsin grocery store are what you would find in foam trays in the regular meat section of an Iowa grocery store!
Now is the time of the year to buy beef and other meats in bulk directly from the producer. People buy meat this way for many reasons: food safety, a vow to buy local, to support small farmers, economy, or just because it tastes better! It is important to me that my meat comes from one animal and that I know how that animal was raised and who processed it. This has become increasingly important with all the food safety issues that are arising. Buying beef in bulk also is still cheaper than buying beef at the grocery store and allows me to have cuts of meat that I wouldn’t normally buy because the high price.
Basically, this is how it works. You contact a farmer (who has a good reputation and uses a processor with a good reputation) who agrees to sell you beef. The farmer should be able to tell you what the average hanging weight of the meat will be so you have an idea of how many pounds of meat you will be buying. Either he/she or you find enough people to buy the whole animal’s worth of beef. Then the animal is transported to the local processing plant where it is killed, dressed, and the carcass is hung for a week or more before being cut. You pay the farmer the hanging weight of the meat at the current market price or the price agreed upon, which is sometimes higher than market price if it is grass fed or organic. You pay the processor the cost of killing, hanging, and cutting the meat when you pick the meat up.
The farmer should be able to tell you when the animal is going to the processor. You may want to ask the farmer if you can pick what breed of animal you are being sold. A milking breed, Holstein or Jersey, will be leaner and have a higher bone to beef ratio. A crossbreed or pure-bred beef variety will be fatter with a greater fat and meat to bone ratio. (I prefer a beef breed myself.)
The processor should call you when the meat is ready to be cut to find out your preferences as far as different cuts and the thicknesses of steaks and the number of steaks per package, pounds of hamburger per package, and the size of roasts. Some processors will have a checklist of cuts that they will go over with you when they call. Other processors will go with a standard number of cuts that they don’t state and expect you to ask for anything “special.” Be sure to ask questions. There are usually extra charges for making hamburger patties and extra tenderizing. You can also ask for cuts that are not listed, such as brisket, flank, ribs, extra soup bones, suet, heart and other organ meats, tongue, the ox tail, rib and arm roasts, and even dog bones! You paid for most of it as part of the hanging weight—you might as well use it!
There are also things you can ask the processor to do. If you cook with a crockpot, be sure to ask that they cut the roasts so they will fit in a crockpot. Be sure to tell them to give you only the best chuck roasts (there are only so many really decent chuck roasts in an animal) and make the rest into hamburger or stew meat. You can ask that certain cuts be run through the tenderizer twice rather than once (Swiss steak is an example of such a cut). If you are sharing a half, you may need to agree with the person you share with on the thickness the steaks will be cut. (I prefer ¾ inch.) You can also request that your roasts be boneless. Be sure to tell the processor how lean you want your hamburger (I ask for 10% fat—90% lean).
There are also trade-offs. If you order a rib roast, then you are giving up rib eye steaks; if you order a whole loin, then you are giving up fillet mignon steaks; if you order T-bone steaks, then you are giving up New York strip steaks and fillet mignon steaks.
Most producers and processors are honest, but here are some things to watch out for:
Keep track of what you order during that telephone conversation with the processor and make sure that you are getting those cuts when you pick up your meat.
If the quality and taste of the meat you buy is uneven, don’t go back to that processor. They are probably mixing “boxed beef” and selling the better cuts of the animal you paid for! You usually can’t prove anything, but you don’t have to give them any more of your business. Definitely don’t send anybody else there to be fleeced.
A pet peeve of mine is when the processor won’t give me the ox tail. Ox tail makes the best soup and some processors like to keep it and sell it themselves along with the more choice organ meat. I paid for the hanging weight of that ox tail, and by golly, I want it!
If all the meat you have ordered tastes gamey, a number of things may have happened. Someone put together your entire order from boxed beef, the processor didn’t scrape the carcass carefully, or the animal was ancient. You have several options: complain to the processor; make a lot chili, taco meat, and barbeque to mask the flavor; don’t go back to that processor or farmer again, or all of the above.
If the producer doesn’t conduct business in a timely fashion, let them off the hook and find another farmer to sell you meat.
Once you’ve bought beef directly from the producer, you will never want to buy it from the grocery store again! The quality is superior, the average price per pound is great, and the convenience of “shopping” from your own freezer can’t be beat. Begonia
I ate my first pressure cooked meal while visiting my sister many years ago. She cooked a pork loin roast in about 37 minutes. After browning the meat and getting the pot up to pressure, all the cooking happened on the lowest heat setting. Supper was on the table in record time.
I recently received a small magazine from my electric coop with an article on small appliances that save energy. (I feel a warm glow because this just reinforces my natural tendency to acquire as many small appliances as possible.) Listed among the gadgets were pressure cookers, which cook stuff in 30 percent of the time it takes to do the job with regular pots and pans on a stove top. Since pressure cookers also cook with less water in less time, food retains more of its nutrients.
My sister found her pot at a local garage sale, so I decided to keep my eyes peeled for my own pot while out saling. I still remember the sale were I found my Futura pressure cooker. It was a group “Coming of Age” sale. A bunch of gals turning 50 years old decided to clean house and free themselves of tons of gently used or new stuff. My Futura pressure cooker still had the tags on it! I bought it for $5. (Yes, folks, I live in the land of plenty.) This cooker doesn’t twist or clamp shut; it closes like an aircraft door. As pressure within the pot builds, the lid presses up against the rubber gasket and the inside rim of the pot. I have no complaints except that parts have to be imported from India, which mean they cost more and are a hassle to order.
If you find a pressure cooker at a garage sale, don’t buy anything that is over 30 years old. Be sure that you are buying a newer one with a cover locking mechanism. The old cookers have a well-documented history of blowing up “real good.” You may need to replace the rubber gasket that fits inside the rim of the lid (it should be uncracked and flexible), but they aren’t hard to find online or at a farm store. Always ask for the owner’s manual. If the seller doesn’t have it or can’t find it, you usually can download an owner’s manual from the manufacturer’s website.
Give pressure cooking a try! You won’t be disappointed. Begonia
We are now experiencing Indian Summer in Wisconsin. We have had two frosts, and the weather has warmed up for a brief time before settling down to cool, rainy autumn.
There is always a big flurry of activity among gardeners at this time of year to harvest and store the last of the summer produce. My friend had bumper crop of end-of-season sweet peppers and no freezer space to store them. I was grateful that she gifted me with a plastic shopping bag of the bounty!
Peppers are one of the easiest vegetables to freeze. There is no need to blanch (boiling briefly)—just rinse, core, knock out the seeds, cut in half, and throw the pieces in a plastic bag. They keep well in the deep freeze until the next crop is ready to eat (saving you a lot of money midwinter when the price of fresh peppers skyrocket).
It is easy to take just what you need for a recipe or meal out of the bag and leave the rest in the freezer. The pieces are not so thick that it is hard to chop them when they are frozen if you wish. I use the frozen or thawed peppers in TexMex recipes, stir fries, casseroles, soups, and egg dishes.
Try freezing some peppers, it beats the work of pickling them! Begonia
The nighttime temperatures have been falling since our September 21st frost date. It smelled frosty late yesterday afternoon, the sky was clearing, and the wind had died down to nothing. Sure enough, there was frost on the lawn this morning.
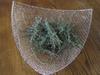
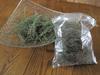
I was very busy yesterday picking tomatoes, okra, green beans, and herbs and bringing in my worm bins, tropicals, and houseplants. Both my dehydrators are full of sage. I also harvested the last of my thyme. I could have partially filled another dehydrator with thyme, but it air dries so well that I decided to save the electricity!
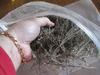
Bundling and hanging the herbs in a dry, dark place (or hung inside paper bags if your drying area is light) is the traditional method. I found a triangular wire mesh basket at a garage sale last season that works very well for the purpose. It also looks good enough to use as a centerpiece on the dining room table while the herbs are drying. Cookie sheets or metal trays with wire cooling racks set in them to hold the herbs (so air can circulate around the them) would work just as well—they just don’t look as nice.
When the thyme is totally dry, I put the twigs into plastic zip-top bags and roll them between my hands to knock off the tiny leaves. Then I pull the bare twigs out of the bag and add them to the compost pile. The tiny leaves gather in the bottom of the bag. After skimming the last few twigs off the top, I transfer these to labeled jars or zip-top bags.
Herbs are a very good barter item. This last batch of herbs will be used as barter for eggs in November and December. A friend of mine who raises organic eggs and meat will trade pullet eggs for herbs gladly. The dried herbs will keep just fine until her young hens start laying at about the time that I run out of eggs from my own hens. (I let the girls naturally stop production each year as the days shorten.)
The great thing about herbs is that you can easily get several cuttings per season, so there is plenty for your use and for barter, even if you only have space for a half-dozen plants. The trimming just makes the herbs bushier and more productive for the next cutting. Begonia
I rarely walk away from a Free Box without something useful. This week it was a microwave potato chip maker. I have a hard time resisting a kitchen gadget at the best of times, but when it is free, it’s twice as potent!
The potato chip maker was still in its original packaging with the instructions printed inside the box, so I know that it was purchased but never used. (I had to destroy the packaging to get at the instructions.) While researching my new find, I also found more recipes and ways of making potato chips in the microwave without the special round potato chip holder. (See http://www.food.com/recipe/uncle-bills-microwave-potato-chips-47195 .)
We enjoyed the microwave potato chips. They’re not greasy and are only as salty as we want to make them, which we all felt was a plus. My potato chip maker is very simple. It is just a round tray with slots in it so that the potato slices can stand on their edges as they cook. Other microwave potato chip makers also include cutters and bowls. On ebay, they range in price from 1 cent and shipping to $11-$12! Free was the right price for me! Begonia
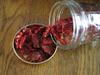
Cherry tomatoes can be a “problem” at this time of year in the Midwest. There are so many of them that people start to give pails of them away. How can you say no to such generosity? So you start eating them as snacks, on salads, with cottage cheese and season salt, even making vegetable juice out of them. Finally, what do you do with those last three ice cream pails that are dead ripe and beginning to attract fruit flies?
You do what you probably should have done in the first place—you get out your food dehydrator and ALL of its drying trays! Cherry tomatoes are one of the least difficult fruits to dry.
Rinse and spread on a towel to air or pat dry.
Cut each tomato in half and prick the skin of each half with a knife.
Lay cut side up and ½ inch apart on dehydrator tray.
Dry until they are crispy, rotating trays if your drier doesn’t have a fan.(Take a fruit from the tray and allow it to cool before testing for crispness.)
Store in an air-tight container away from light and extreme heat.
These little tomatoes can be rehydrated with a little boiling water and used in any way you would use “sundried tomatoes”—on pizza, in soups and casseroles, and pureed with other ingredients to make spreads for special gatherings. They also make great Christmas gifts. Red and Yellow cherry tomatoes look pretty layered in a clear glass jar.
Try drying some cherry tomatoes this year! Begonia
When someone offers me the overflow produce from their gardens at this time of year, I’ve learned to just say, ”THANK YOU, I’LL TAKE IT ALL—REALLY, NO PROBLEM!”
I am in the process of converting more and more of my lawn into garden. I have another garden space that, sadly, is under the malignant influence of black walnut trees, so it no longer produces much food for my family. As a result, I appreciate the generosity of friends and acquaintances at this time of the season.
Today, I am going to blanching and freezing zucchini and making a small batch of salsa. The tomatoes for the salsa came from a good friend and chicken mentor of mine who I visited on her farm last week. She sent me home with cherry and slicing tomatoes and some cucumbers and zucchini that she had been given by someone else!
I dried the cherry tomatoes, made refrigerator pickles from the cucumbers, and I will make the salsa today. I’ll share how I dried the tomatoes and the recipe for the refrigerator pickles this week. Begonia
Whole pork loin was on sale at the local grocery store recently for less than the sale price of chicken breasts. I paid $1.79 per pound. I always try to get my meat for less than a couple of dollars a pound (and often far less as when I buy turkey and ham near the Easter and Christmas holidays). Usually red meat costs more—so we eat less red meat and wait for really good sales. I really hated it when the inexpensive “tough” beef cuts became fashionable. Now I can’t afford to buy flank and skirt steaks unless I’m bulk buying a split half of an entire animal!
Don’t be intimidated by a big slab o’ meat. A whole pork loin is one of the easiest to handle:
Clean your sink and get out your trusty kitchen shears or a sharp knife. Usually, whole loins come in a plastic bag, so just put the whole loin in the sink, snip the bag, drain the juices into the sink, and dispose of the bag after noting the total weight of the loin.
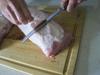
Transfer loin to a cutting board and get out a big, sharp knife.
Trim most of the fat from the loin. There usually isn’t much.
Cut the loin in half and then cut the roasts, remembering the total weight. You should be able to get 3 or 4 two-pound roasts out of the average loin plus a pound or two of stir fry meat from the thinner, fattier end.
Wrap the meat in freezer paper with the waxed side in, or use freezer bags or the empty inner bags in which breakfast cereal is packaged. Seal with masking or freezer tape.
Label and date each package and freeze right away.
I leave the roasts whole. It gives me more leeway in how I will use the meat later. A roast may ultimately become chops or fajita, stew, chili, or stir fry meat. I do, however, cut up the end of the loin because the meat is laced with fat, but there is still a lot of good meat there. I usually package this part of the loin as already-cut-up stir fry meat.
Be sure to take advantage of the next good deal on “the other white meat.” Begonia
I read it somewhere . . . that you could use a coffee grinder to grind spices. When I started running across coffee grinders for 25 and 50 cents at garage sales, I bought an extra one for my “Spare Shelf” (See my July 17, 2010 blog). One day I ran out of cinnamon at a critical point in preparing dessert. There was no time to run to the grocery store. A coffee grinder from the spare shelf and some stick cinnamon from the back of the spice cabinet saved the day.
I now keep a coffee grinder dedicated to the grinding of spices.
General wisdom (or the herb and spice producers wanting to turn a bigger profit) is that all spices are stale after six months and should be thrown out! (I never do this, so don’t take it as sage—cringe!—advice.) It is true that freshly ground spices are more pungent and taste better. Freshly ground coriander and pepper are good examples.
I use my coffee/spice grinder for grinding the spices for my dry chai mix, black pepper for recipes that call for large amounts of that spice, and whenever I run short of the common baking spices, such as cinnamon, nutmeg, and cloves.
Grinding is simple. Just drop the spices in and pulse until they are as finely chopped as you wish. Be sure to unplug and wipe out your grinder after each use so you don’t get any interesting combinations!
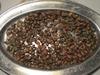
I started roasting some of the pounds of coffee that we consume last year after reading an article in one of my self-sufficiency magazines and then doing some further research on the web. I ended up picking up a Poppery II hot air popper at a garage sale for a couple of bucks to do my roasting. (My son tells me that the older, heavier duty models like mine were selling on e-bay for $60+ last year! He got his at a resale shop for under $10.)
My eldest son used to work for Starbucks and Caribou and has a father-in-law who invested in a home- size coffee roaster, so he had knowledge of coffee and had done some roasting. We roasted the first batch together. I had already read about the first and second crack and what the beans would look like for a light, medium, and dark roast. It still was good to have the support of someone else when doing something new.
The hot air popcorn popper is a fluid bed roaster like the big ones commercial roasters use only on a mini scale. (Mmmm—sounds like a lot of other things we do here on My Little Farm in Town.) The (1/2 cup) beans are cooked on currents of superhot (about 400°F) air inside the popper. The machine blows off the chaff (outer skin of the green bean) during the first part of the cooking time at and around “first crack” and the nibs during the second part at “second crack” (if you are going for a darker roast). The first crack sounds like popcorn popping. The second crack sounds more like Rice Crispy breakfast cereal after you put the milk on it!
We like a really dark roast, so I usually cook my beans for about 10 minutes. (You would cook them less for lighter roasts.) The beans deepen in color as they roast. A dark roast gets very brown and shinier as the oils start to emerge.The cooking beans smell like toast that is on the burned side. There will be some smoke—so roast outside or under a cooktop hood. Some people rig elaborate exhaust systems out windows or roast in or in front of their fireplaces with fans blowing the smoke in the correct direction.
Air temperature and humidity vary the roasting times. I’ve learned the hard way that a hot air popper can’t generate enough heat for a dark roast when the air temperature outside is 41°F with a wind blowing! (I had to finish that batch indoors!) Another thing I’ve learned from an expert is that is that you will want to let the machine cool a little between multiple batches so you can wipe it out with a dry paper towel or you WILL eventually have a fire!
You should let your beans “age” for at least 24 hours after roasting (if you can resist that long) because there is enzyme action that takes that long for full flavor development. Happy brewing! Begonia.
Trying to save money on electricity? Our electric rates have risen 50% recently! Electric stoves use a lot of energy. Next time you have to cook noodles, try cooking them this way and lower your electric bill a bit. Bring the water to a boil and then add the noodles and stir. Cover the pot and turnoff the heat. Set a timer for 20 minutes and leave the pot of water and noodles set. When thetime is up, stir and drain the noodles. They should be done to a turn! (Spaghetti may take a little less time. )
The same method can be employed when hard cooking eggs. Cover the eggs with one inch of cold water and rapidly bring to a boil, then cover and take off the heat. Set a timer for 22-24 minutes. When the time is up, drain and cool in cold water.
Hope this tip helps you offset the rise in your electric bill a little. Bon Appétit. Begonia
One of the tips for the day recently on ThriftyFun.com concerned reuses for the extremely stout inner packaging of breakfast cereals and crackers. These bags can also be used to freeze food. When I buy chicken or ground turkey in bulk, I divide the meat into meal-size portions and place them in one of these bags, squeeze out the air, and fold it closed, and tape it shut with masking or freezer tape. These bags don’t leak and are tough enough to bump around the deep freeze without breaking.
This tip was one of the first things I learned from a good friend of mine when I was part of our Frugal Friends group. The group is disbanded now, but I picked up a lot of good information and have made contacts to coop on food. I still share halves of beef and get tips on bargain shopping food with one of the friends I made while in the group.
You might think about getting together with some other kindred spirits to share information and pool resources. It is a good way to offset some of the rising costs of living. Begonia
Disclaimer: MyFrugalLife.com cannot accept any responsibility for any injury or damage that you may cause to yourself, others, or property when following any advice given on this site. MyFrugalLife.com has no control of how you may use information you get from this site and does not attest to the validity of any information found within. Much of this information comes from third parties (newsletter readers and other contributers). Use advice found in our newsletters and on our site with common sense and at your own risk. If you see something in our newsletters or on our site that you disagree with, please let us know. Our goal is print only valuable information and advice.