| Showing 9 posts from September 2010 for this blog. |
Chickens: Dust Baths and Boxes
Wednesday, September 29, 2010
I remember the first time I saw one of my pullets (female chicks) bathing. I thought she was dying! She was lying on her side sporadically scratching with one leg and flopping a wing around. When she flopped over and started doing it on the other side, I finally caught on to what she was doing.
All birds bathe in some fashion. Mike, my grandmother’s naughty green parrot, loved his daily shower in the bathtub. Even the pitiful birds in wire cages in the factory egg farms will try to bath each day—poor things.
My chickens are a little more down to earth. Before my husband built their dust box, they bathed in the dirt of the yard and the litter in the bottom of the coop. If they have been off the roost for a half hour before I open the coop for the day, I will see signs that they have been down in the pine shaving litter taking their first dust bath of the day.
Birds seem to enjoy bathing, but one of the most practical reasons for doing it, one that is hardwired into their peas-sized brains, is to control vermin. There is a pest that specializes in almost every part of a bird: head, neck, body, and even feather shafts! With even the cleanest coop and yard, chickens can pick up lice and mites from wild birds and other sources.
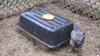
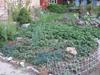
Why provide a special box for dust bathing when the birds already seem to be taking care of the job? I want to have a little more control over the bugs at all times of the year. My dust box is out in the chicken yard because it takes up too much floor space in the coop. I cover it with a plastic cement mixing trough when it looks like rain or snow. I keep it supplied with a mixture of sand or sandy soil and clean hardwood ash in a 6:1 ratio (six parts sand to one part ash). I also sift the mixture so that there are no chunks of charcoal or other matter that might damage their feathers.
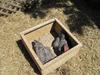
When the birds bath in the dirt/sand and ash mixture, they scratch it up and puff it under their wings and through all of their body, neck, and head feathers. The ash coats their skin and feather shafts with a fine, base coating of ash that discourages bugs. Bugs breathe through little holes in their exoskeletons and the ash clogs these holes. The pH of the ash also may have some effect.
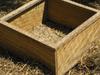
The dust box should have high sides and a rim that keeps dust from puffing out of the box too much. The box should be able to hold more than one bird at a time. My box is made of plywood and the edge on top is about two inches wide. The box is about 30 in by 30 in. My husband used a pattern from an article in Backyard Chicken magazine. (This is a great publication. You can get a free copy by going to their website, www.backyardpoultrymag.com , or by sending in a postcard from one of those back-to-the-land postcard promotion packs.)
Our dust box had to be modified from the original pattern because my girls wouldn’t use it after the first try. We figured out that they didn’t like getting into something that they couldn’t stand up and see out of. I think it made them feel too vulnerable to predators. As soon as five or six inches of height had been removed, they started fighting each other to get into it. They also seem to like to bathe in groups. Sometimes there will be three birds in the box at one time!
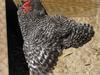
My girls enjoy their box many times a day and use it year round. They are beautiful healthy birds, and it is the least I can do for all that they give back to me in the form of eggs and enjoyment. Begonia
Images:
1 Comments | Post Feedback |
|
Picking Strawberries
Saturday, September 18, 2010
The Ozark Beauties are bearing an autumn crop. The berries are fragrant and have a wonderful sweet, true strawberry taste. It is odd to be eating a fruit just a few days before the frost date that smells and tastes like June. It feels like the year is running backward!
My experiment with everbearing strawberries won’t be complete until next May or June. I’ll cover these plants later in the fall and uncover and fertilize them early next spring. There are three varieties in three beds on this slope of my front yard. I planted them mainly to hold the slope. Of course, the variety that I planted on the steepest part of the grade is the one that spread the least! I will have to transplant plants from the more luxuriant beds into the thin spots—that is, whatever variety makes it through the winter!
That is the wonderful part of gardening. There are plenty of opportunities to try new varieties and enjoy new experiences like eating homegrown strawberries in September. Begonia
Images:
0 Comments | Post Feedback |
|
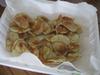
Garage Saling: Free Box Microwave Potato Chip Maker
Tuesday, September 14, 2010
I rarely walk away from a Free Box without something useful. This week it was a microwave potato chip maker. I have a hard time resisting a kitchen gadget at the best of times, but when it is free, it’s twice as potent!
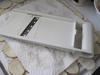
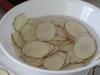
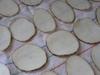
The potato chip maker was still in its original packaging with the instructions printed inside the box, so I know that it was purchased but never used. (I had to destroy the packaging to get at the instructions.) While researching my new find, I also found more recipes and ways of making potato chips in the microwave without the special round potato chip holder. (See http://www.food.com/recipe/uncle-bills-microwave-potato-chips-47195 .)
We enjoyed the microwave potato chips. They’re not greasy and are only as salty as we want to make them, which we all felt was a plus. My potato chip maker is very simple. It is just a round tray with slots in it so that the potato slices can stand on their edges as they cook. Other microwave potato chip makers also include cutters and bowls. On ebay, they range in price from 1 cent and shipping to $11-$12! Free was the right price for me! Begonia
Images:
0 Comments | Post Feedback |
|
Collecting (Things of Little or No Value): Mug Mania
Friday, September 10, 2010
Mug collecting—it is a mania that runs in my family. My sisters collect mugs, my mother collects mugs, my MOTHER-IN-LAW collects mugs, but I won’t write about those because they are Royal Dalton Tobies and actually have collector value!
My mother‘s mug collection is so large that she rotates them. She has a few boxes stashed in the basement that she exchanges with the ones in her cupboard from time to time. I think it is a clever way to enjoy an extensive collection, don’t you?
One of my sisters works in a lab. She used to scoop up the organ (the internal kind) mugs whenever the drug reps brought them in as freebies. She regularly sips her morning brew from a liver- or kidney-shaped mug. (This would put some people off their Wheaties, but we Kiefer gals are made of sterner stuff!)
I find most of my mugs in church basements and people’s garages during the saling season and in second hand and thrift stores during the colder months. (I enable my mom and sisters’ mug habits with my 10-cent finds from St. Vincent de Paul and Goodwill.) I did break down and buy a beautiful brown transferware china mug with a Royal Palm turkey on it for 99 cents at the Hospice resale shop. I presented it to my mother as a Thanksgiving present.
One of my favorite finds came from a local church rummage sale. Their garage sale isn’t the biggest, but it sure is interesting. You never know what will turn up. One year, I found the wall oven ($25) that will soon replace our present museum piece—another year, a wicker rooster and a collector plate of the Pilgrim Memorial Monument. The last great mug I found there was what we call “Beduin Tent,” a mug emblazoned with an image of Liberation Tower, “STATE OF KUWAIT” (in English and Arabic), and an oasis scene of a large, low tent; a mom camel with a baby camel nursing, a guy in native dress, two gals in burkas by what looks like a well with some clay jars nearby, and some folks off on distant dunes riding “ships of the desert.” Why endure the danger and expense of travel to distant locales when you can get it all on a commemorative mug (for 25 cents) from the basement of the Zwingli UCC?
The next time you run across a mug (or platter or tablecloth or lamp. . . . ) that speaks to your inner collector (of things of little or no value) don’t resist—especially if it is priced under a dollar! Begonia
Images:
2 Comments | Post Feedback |
|
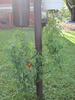
Upside-Down Tomatoes: Frist Fruit
Wednesday, September 08, 2010
I was afraid I wouldn’t get any ripe fruit from my hanging tomatoes before frost. My worry was groundless. I picked the first fruit, and we ate it on a salad recently. I still don’t know what variety it is, but it must be an early one!
The plants are doing well through this hot, dry weather. The chicks are stressed by the heat and humidity, but the tomatoes love it as long as they are watered. I have been watering the tomatoes daily; otherwise, there would be problems with the fruit ripening correctly and blossom end rot. (I did have a little blossom end rot on one of the hanging tomatoes because I let it get too dry when the fruit was forming.)
The upside-down tomatoes turned out to be a successful experiment. I think I will grow some again next year. Begonia
Images:
0 Comments | Post Feedback |
|
Tiling Tip
Monday, September 06, 2010
I was chatting with my husband as he grouted the shower last Saturday. He’s been remodeling one of our bathrooms for the past year.
It is slow going because he is on the learning curve for some tasks, such as wiring, and it just takes time to find materials at garage sales (recessed lighting fixtures $10, new faucet $15, floor tile $10, and paint $5), liquidators (toilet paper and towel holders $3 each), and the Habitat for Humanity ReStore (sink $10, a new window $40, and tile for the shower $36). We did buy a few things, such as a small piece of counter (on sale at Menard’s) mastic, grout, insulation, and ceiling and cabinet paint (cheap from Walmart). We will put the money saved into a nice water-saving toilet.
Time is also precious. That is another reason why these projects take a while to complete. First, we work to pay the bills, then we work on home improvement projects.
I noticed that he was using my pink dust pan to hold the grout and then would push its edge against the wall beneath where he was working with the grout. I commented on his creative use of cleaning equipment, and he said that he’d been wasting a lot of grout until he had “repurposed” the dust pan. I’m glad I married such a clever, hardworking, and handy fellow! Begonia
Images:
0 Comments | Post Feedback |
|
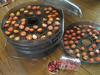
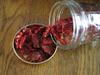
Drying Cherry Tomatoes
Saturday, September 04, 2010
Cherry tomatoes can be a “problem” at this time of year in the Midwest. There are so many of them that people start to give pails of them away. How can you say no to such generosity? So you start eating them as snacks, on salads, with cottage cheese and season salt, even making vegetable juice out of them. Finally, what do you do with those last three ice cream pails that are dead ripe and beginning to attract fruit flies?
You do what you probably should have done in the first place—you get out your food dehydrator and ALL of its drying trays! Cherry tomatoes are one of the least difficult fruits to dry.
-
Rinse and spread on a towel to air or pat dry.
-
Cut each tomato in half and prick the skin of each half with a knife.
-
Lay cut side up and ½ inch apart on dehydrator tray.
-
Dry until they are crispy, rotating trays if your drier doesn’t have a fan.(Take a fruit from the tray and allow it to cool before testing for crispness.)
-
Store in an air-tight container away from light and extreme heat.
These little tomatoes can be rehydrated with a little boiling water and used in any way you would use “sundried tomatoes”—on pizza, in soups and casseroles, and pureed with other ingredients to make spreads for special gatherings. They also make great Christmas gifts. Red and Yellow cherry tomatoes look pretty layered in a clear glass jar.
Try drying some cherry tomatoes this year! Begonia
Images:
0 Comments | Post Feedback |
|
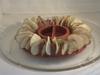
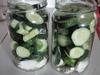
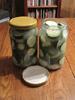
Sour Refrigerator Pickles: Much Ado About Cucumbers
Thursday, September 02, 2010
My dark literary roots are showing today! Didn’t a famous woman say, “You can never have too many cucumbers?” I spent all last summer trying to foil vine borers (unsuccessfully) and all last winter dreaming of cucumber salads and gently sweating jars of refrigerator pickles.
When I was offered my first paper grocery bag of cucumbers, the first thing I did (after saying Thank You!) was make the following recipe:
Sour Refrigerator Pickles
-
8 cups of small or thick sliced cucumbers
-
1 large sliced onion
-
2 large dill flowers (or dill seed)
-
1 ½ teaspoons dry mustard
-
3 or 4 cloves of garlic
-
½ cup sea, canning, or uniodized salt
-
2 ½ cups white vinegar
-
8 cups water
-
Layer cucumber, onion, and dill in a gallon glass jar or a number of smaller jars.
-
Combine the rest of the ingredients in a large pot and heat until the salt melts—no need to boil.
-
Cool brine before pouring over the contents of jar(s) and refrigerate. (If brine is warm or hot, it will cause the finished pickles to be soft—YUCK!)
You can begin eating these pickles whenever they taste good to you. If you don’t like garlic or onion you can leave it out. If you just want a garlic pickle, leave the dill out. This is a flexible and forgiving recipe and can be increased or decreased, as long as you keep the vinegar, water, and salt ratios constant.
This is not a canning recipe, so don’t even think about it :-) ! These pickles keep for a long time in the refrigerator. The onion and garlic pickle right along with the cucumber, so be sure to enjoy them as well. Begonia
Images:
2 Comments | Post Feedback |
|
Tomatoes, Zucchini, and Cucumbers: Just Say Thank You!
Wednesday, September 01, 2010
When someone offers me the overflow produce from their gardens at this time of year, I’ve learned to just say, ”THANK YOU, I’LL TAKE IT ALL—REALLY, NO PROBLEM!”
I am in the process of converting more and more of my lawn into garden. I have another garden space that, sadly, is under the malignant influence of black walnut trees, so it no longer produces much food for my family. As a result, I appreciate the generosity of friends and acquaintances at this time of the season.
Today, I am going to blanching and freezing zucchini and making a small batch of salsa. The tomatoes for the salsa came from a good friend and chicken mentor of mine who I visited on her farm last week. She sent me home with cherry and slicing tomatoes and some cucumbers and zucchini that she had been given by someone else!
I dried the cherry tomatoes, made refrigerator pickles from the cucumbers, and I will make the salsa today. I’ll share how I dried the tomatoes and the recipe for the refrigerator pickles this week. Begonia
0 Comments | Post Feedback |
|
|