| Showing 13 posts from November 2010 for this blog. |
Tucking in for the Winter
Monday, November 29, 2010
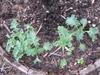
I’ve been tucking in the back (and front) “40s” this past few days (and I have the aching back to prove it)! The weather is going to dip down into the teens Fahrenheit in the next few days, and now is the time to get these final tasks done.
Our small town gives us excellent value for our tax dollar in the areas of street management and yard waste pick up. They are picking up the last loads of brush and leaves today. I left a good size pile of sticks and branches. Our trees are large and mature. They drop a lot of wood into the yard. Most of it I burn in the chimineas, but I didn’t have time for as many fires as I would have liked this year, so my kindling pile is now on the curb along with raspberry canes and lots of willow, which falls continually and is quite a nuisance.
I’ve been covering and uncovering the cold frame daily. Once the temps started falling into the teens, I started banking it with a bale’s worth of straw “slices.” A kind neighbor picked up the bale of straw at the village composting site and gave it to me. People use them for decoration and then discard them. (It would be nice to find a few more—I need to cover my strawberries at some point.)
I carried my lawn chairs, benches, and tables up to the patio and covered most of them with a vinyl tablecloth and stowed my one marble top in the birdseed bin. (Marble weathers badly here if it isn’t protected.) I also put away miscellaneous garden ornaments that I had missed earlier, and my husband stowed away the terra cotta in another outdoor storage area. I don’t think I could squeeze one more thing into the wood box!
The rain barrels have been disconnected from the house and drained. I’ve left one watering can outside so that I can water the cold frame a few times before I pick that last salad!
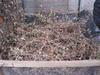
I also worked on tidying the north side of the house and compost bins. I put another layer on the full one and cleared the other side so that I could add layers of chicken manure and kitchen scraps as the winter progresses. I have a few bags of leaves set aside for that purpose as well. I am going cut back the last of the mums that are now done blooming today and add them to the pile as that first rough layer!
We are supposed to get snow tomorrow. I can watch it fall and the birds feed with a clear mind. That is the wonderful thing about living in a temperate zone. You get a rest from active gardening, and time to reflect on the previous growing season and plan for the next. Begonia
Images:
0 Comments | Post Feedback |
|
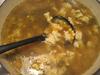
Odds and Ends: Don't Throw Away That Carcass!
Friday, November 26, 2010
I probably should have posted this before Thanksgiving, when many people were cooking a whole bird and throwing away one of the best parts! Oh well, you can always redeem yourself with the Christmas turkey.
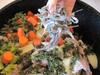
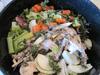
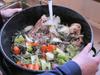
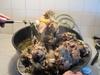
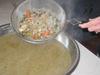
When preparing your bird for roasting, be sure to save and freeze the neck if you aren’t going to use it right away for broth to make gravy. Set aside the carcass of the turkey, including bones from the drumsticks, wings, and thighs after carving. (Don’t save any bones from parts of the turkey that people have put in their mouths. Cooking with bones that people have slurped all over is both gross and disturbing—even though you will be boiling the bejeebers out of them. That’s my opinion, but it is your call!) I throw away the fat, tail, and skin because I like a leaner broth. (You can put the carcass in a large plastic bag and freeze until you are ready to make broth if you don’t have time to make it the same day.)
Put the carcass and neck into a big pot when you are ready to make broth. Cut into large pieces and add:
-
3 large onions
-
5 or 6 stems of celery
-
2 large carrots
-
6 or more whole peppercorns
-
A generous handful each of parsley and sage
Cover the contents of the pot with one to two inches of water and bring to a boil. Simmer until the carcass falls apart. Add water as needed to cover carcass as it cooks.
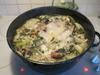
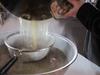
Remove most of bones and vegetables with a slotted spoon and pour the broth and what solids remain through a strainer or cheese cloth. I use a wire strainer, but if you want a clear broth, line the strainer with cheese cloth. Throw away the bones and spent vegetables and herbs—all of their goodness is now in the broth and they are pretty much mush.
My broth usually doesn’t have enough fat in it to worry about because I discard the skin, tail, and visible fat while carving the turkey, but sometimes it is necessary to remove fat. You have several options:
-
Chill the broth and scrape the fat off once it rises to the top and solidifies.
-
Skim with a spoon and then drop paper towels onto the surface of the broth to absorb the last of the fat.
-
For small amounts of broth, use a fat separator pitcher to drain broth from underneath the fat that has risen to the surface.
You now have broth to make soup, gravy, or sauce or with which to cook rice, vegetables, or potatoes. You will note that I didn’t add salt when creating the broth because I use it for so many different purposes. (I add differing amounts of salt depending on the dish.)
You can use the broth right away, refrigerate it for a couple of days, or freeze it for months until you need it. I usually freeze my broth in 2-cup and 2-quart batches because these are the most common quantities needed for my favorite recipes.
You can use this method of making broth with chicken and beef, too. There is nothing nicer than the smell and taste of a good bowl of homemade broth in the winter. Begonia
Images:
0 Comments | Post Feedback |
|
Grinding Your Own Breakfast Cereal
Wednesday, November 24, 2010
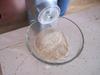
I picked up a Back to Basics manual grain mill at a garage sale a few years ago that someone had bought as preparation for the year 2000. It was new in the box and cost me $5. I took it home, put it on a shelf in my pantry, and forgot about it.
I remembered the little grain mill while in my favorite bulk food store. I picked up a bag of wheat berries and thought, “I’ve got a grain mill I’ve never tried out!” I bought a bag of wheat, took it home, put it on a shelf in my pantry, and forgot about it!
I was sitting in my recliner with my breakfast coffee and a boring bowl of cold cereal and thought “Wouldn’t a bowl of hot cereal other than oatmeal or Coco Wheats be a nice change? “
And then I remembered! I got the grain mill out, retrieved the bag of wheat from the pantry, and started experimenting.
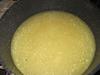
I found that I could get several grinds from the very simple mill depending on how tightly I screwed down the handle. I can make cracked wheat for bread, a finer grind for farina breakfast cereal, or a border-line coarse flour for whole wheat bread (it took a while to grind enough flour for bread with the little mill).
I’m usually not a fan of plain farina or “Cream of Wheat” hot cereal, but I found that the fresh wheat made a superior product to what I have bought from the grocery store. I added cinnamon to one batch and it smelled and tasted wonderful.
I prepared the cereal by bringing ¾ cup (6 oz.) water with a pinch of salt to a boil and sprinkling three tablespoons of farina into the boiling water while stirring constantly. Then I turned the heat down and continued to stir and cook for one or two minutes until the mixture thickened. I then took the pot off the heat, covered it, and let it sit for a few minutes covered and allowed it to thicken some more. Finally, I transferred the cooked cereal to a warm bowl with brown sugar, a little butter, and milk or half and half.
When properly stored in a cool, dry place, wheat keeps well for a year or more. When it is ground, it has a short shelf life before it begins to go stale (the wheat flour from the store has a stronger taste for this reason) because of the oil in the wheat germ. I freeze what flour or farina I have left over from each grinding for this reason.
If you get really serious about grinding all your own flour, you will probably want to buy a bigger hand or electric mill. For now, I’m just dabbling and will stick with my little one! Begonia
Images:
0 Comments | Post Feedback |
|
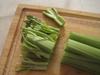
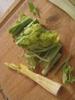
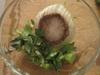
Odds and Ends: Celery Ends and Centers
Monday, November 22, 2010
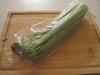
There was a great sale on celery at the grocery store this week. (Celery is in season right now.) I love to shop for food near the Thanksgiving, Christmas, and Easter holidays because there are so many great deals on beef, ham, and turkey and the different vegetables and canned goods that go into preparing the feasts for these holidays.
One of my pet peeves is waste. It is part of the reason that I junk pick, give stuff away, reuse things, and wear things out.
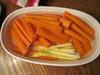
One sore spot for me is our almost criminal waste of our vegetable resources! I’ve watched people cut off and throw away the ends of celery—the part where the stems branch and above. (Yes, Earth Shaking isn’t it?!) The leaves are the best part for making stock and are also good in a green salad. (You can actually grow Cutting Celery that you only use to make stock or dry to make celery flavoring!) The branching stems also can be sliced or chopped and used like any other part of the celery.
The center (that tight little cluster of tender leaves and stems) of the celery stalk, another part I have seen people discard, is the most wonderful part of the whole vegetable. Use it as a garnish, in relish trays, chopped and added to salads, or in any other dish requiring celery.
You may think that I’m crazed for ranting about celery ends and what to do with them, but if I won’t, who will? We all pay too much for food to throw it away. Begonia
Images:
2 Comments | Post Feedback |
|
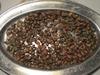
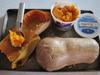
Eating in Season: Hulless Pumpkin Seeds
Saturday, November 20, 2010
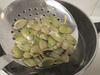
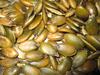
A friend of mine was experimenting with new cultivars and grew pie pumpkins with hulless seeds called Snack Face ( http://www.jungseed.com/dp.asp?pID=03285 ) this year. I'll be trying a few hills of these little beauties in my front yard next season! The seed, indeed, was hulless and very strange looking. I am used to the usual pumpkin seeds with their leathery white hulls. These seeds were a funny black green when raw and a brown green color when boiled, baked, and ready to eat.
I started out by cleaning the pumpkin like any other hard winter squash:
1. Scrub the shell of the pumpkin with a few drops of dishwashing liquid and rinse well.
2. Cut the pumpkin in half with a big knife.
3. Scoop out seeds with a spoon and by combing your fingers through the stringy guts! Discard guts (or compost or feed to your chickens!).
Then I cleaned and cooked the seeds:
1. Place seeds in a colander and rinse, picking out any stray clumps of fibrous “guts.”
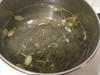
2. Dump seed into a sauce pan and cover with a couple inches of water and a tablespoon of salt.
3. Bring to a boil and then simmer for 15 minutes.
4. Dump water and seeds in the colander again—DO NOT rinse—and drain off all excess water.
5. Spread damp seeds evenly in one layer in a shallow baking pan.
6. Bake at 350°F for 30 minutes or until crisp and dry when cooled, stirring every 10 minutes to prevent burning.
The neat thing about this cultivar is that it is also a pie pumpkin. The walls of the pumpkin are thin when compared to other pie varieties, but the flesh is as sweet as a winter squash and a bit less fibrous than a pie pumpkin. Both the seeds and the flesh taste wonderful. (For cooking instructions, see my November 14 blog, Eating in Season: Winter Squash.) If you enjoy growing pumpkins and squash, this would be a good variety to try. Begonia
Images:
0 Comments | Post Feedback |
|
2010 Nightmare Before Christmas: A Family Tradition
Wednesday, November 17, 2010
Every November my side of the family kicks off the holiday season by gathering to share good food, good company, and attractively wrapped atrocities. Other families with warped senses of humor have similar gatherings and call them White Elephant exchanges. We call our party simply—THE NIGHTMARE.
Each year I clean my house and put up several tacky plastic trees which I have come to love dearly (Blog to follow!) My guests arrive, we visit, eat lunch, and then gather in the family room in front of a brightly lit Christmas tree surrounded by sometimes oddly shaped but attractively wrapped Presents of Horror. Each person picks a number, and the presents are chosen and opened in that order. There is no stealing or exchanging of wrapped or unwrapped presents—no one would want to!—just a lot of laughter and expressions of horror and dismay as each ghastly present is revealed. (No off-color gag gifts or regifting from the previous year’s Nightmare is allowed.)
When all gifts have been viewed and the first shock has worn off, the voting begins. The giver of the gift with the most votes for nastiest present of the year wins the grand prize. My eldest sister always donates the prize, which is actually something nice. Then we all share who gave what present, were it was found, its cost, and any story connected to the purchase of each fiendish Violation of the Christmas Spirit.
Our gifts are not simply unique, off beat, or tacky. They are disturbing, horrific, creepy—sometimes even panic inducing. We garage sale and thrift shop each year with the upcoming Nightmare always lurking in the back of our minds. When we run across that perfect gift, there is no hesitation, just an overwhelming urge to purchase at the lowest possible price. One year it may be a creepy chalk clown head (which my Mom stored on a shelf at the bottom of the basement stairs after the party, until she had to get rid of it by popular demand. It was freaking out everyone who went downstairs for potatoes.) Another year it might be a spectacularly tasteless five-foot-long oil-spouting swag lamp with scantily clad nymphs in gold plastic. My favorite was the exquisitely wrought “butt brick,” a hefty hunk of wax molded from the bottom half of an ancient bas relief of the three Graces (Hey, it was Art!).
Some gifts were destined to become bizarre garden ornaments or equally distressing household décor because some small child instantly fell in love with them, such as the famous owl lamp with built in peanut dish (or was it an ash tray?) or this year’s fluffy fun fur owl-on-a -stick. Other gifts are quietly deposited in the first available dumpster.
Each gift has its provenance, such as the stuffed rattle snake I found last year and purchased for the princely sum of $3. It was a gift requested by a five-year-old boy whose parents were going away on an anniversary trip to the Southwest. He wanted them to bring back for him a pair of cowboy boots and a rattle snake. They honored both his requests. The snake now graces the science classroom of a Catholic grade school in Chippewa Falls, Wisconsin. Surprisingly, the rattler did not earn me the grand prize that year—I am still bitter.
The first winner of this nightmare competition was what we called “The Bordello Lamp” with its giant, bulbous, amber-glass base with malfunctioning night light and scarlet shade shaped like a saloon girl’s corset and skirt, complete with dingle-berry trim. It had a commanding presence, standing nearly four and a half feet tall. (It ended up becoming an anonymous cabin warming gift at several hunting camps up north.)
The most recent (and I think most repugnant) winner was a set of cattle hooves made into pillar candle holders. (I actually felt my gorge rise when I got my first good look at them. Gulp!) They looked and smelled vile (that rhymes with bile). My sister caught her Golden Retriever slinking off to bury one of the pair in the woods the week before our get together! The aroma that rose from the wrapped gift had our cat Bert sniffing around under the tree as well.
This is definitely not a holiday tradition for the faint hearted, but even my 87-year-old mother looks forward to it annually (amazing considering that she took home a repulsive, grass-skirt-clad coconut monkey this year). Soon four generations will again begin to taunt each other and drop dark hints about the “gift” that will surely earn them the grand prize next year. Season’s Greetings! Begonia
Images:
2 Comments | Post Feedback |
|
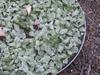
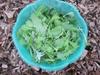
Eating in Season: Frost Salad
Monday, November 15, 2010
We had our first little bit of snow yesterday. I’m not too happy about it because my chickens are molting, and this means keeping them inside with the heat emitter plugged in! When I woke up this morning, everything was covered thickly with frost. The roofs of the houses around us were white. It looked like snow!
One of the first things I noticed were the leaf patterns of frost on the top of my van parked below my window in the driveway. Then I began to think about my greens. I planted kale, garden cress, and maches of three varieties in some of the barrel planters in the front yard. I had read that maches, kale, and garden cress—the maches in particular could freeze, and if left to thaw in place, would be perfectly fine for picking later in the day.
You know what? It’s true.
I just picked a salad that I will serve with supper tonight from my front yard garden and the cold frame—in November after lots of frost and a little snow. (I planted in September.) My goal is to still be harvesting by Christmas. There is a guy in Dubuque, Iowa, who served a fresh salad of greens from his cold frame every Christmas. He was featured in the paper every year we lived there, grinning for the camera and holding open a cold frame filled with greens among the snow drifts.
That is my goal for this year—Christmas Salad from My Little Farm in Town. Begonia
Images:
0 Comments | Post Feedback |
|
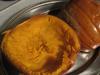
Eating in Season: Winter Squash
Sunday, November 14, 2010
I’ve been cooking up all the squash I’ve been accumulating for the last few months. (I ran across a great deal on butternut squash—3 for $1.) I needed the floor space! Winter squash like pumpkins, butternut, and acorn, once field hardened (allowed to dry for a while outside so that their skins become hardened and so resist bruising), can store well for a long time at room temperature with low humidity. Some squash have a longer storage life than others. Pumpkins and butternut squash will keep all winter if their skins are not bruised or broken, while acorn squash must be eaten within a much shorter time or they begin to decay.
The flesh of some squash is finer grained, such as butternut and buttercup, and better for use in pie and casserole recipes. Other squash, such as the spaghetti or acorn squash, have a more fibrous consistency and are best eaten stuffed or with butter and brown sugar right out of their shells.
The easiest way to cook a squash is to bake it, but there are a few things you need to do before you pop it in your oven.
1. Wash the outer shell of the squash with a brush and a few drops of liquid dish soap and rinse well.
2. Cut the squash in half right down the middle with a big knife. I have a special tool that I slip over the knife blade that allows me to bear down on the pointy end of the knife safely. Some squash needs to be cracked open with a chisel or an ax—I use this method with big Hubbard squash.
3. Scoop out the “guts” and seeds. I use an ice cream scoop.
4. Place cavity downward on a shallow greased pan.
Bake in a medium oven (350°F) for 30 minutes or until a fork pushes easily through the shell and flesh.
Allow the squash to cool and then scoop the cooked flesh out of the shell in chunks and pack into freezer containers or bags.
You can use the cooked squash right away or it keeps well in the freezer until you need a pick-me-up later in the winter. Squash are rich in beta carotene and are very good for you! Enjoy. Begonia
Images:
0 Comments | Post Feedback |
|
In the Freezer: Buying Beef in Bulk Directly from the Farmer
Thursday, November 11, 2010
Years ago, a gal who had worked in several small, excellent processing plants in Iowa—where they really know how to cut meat—guided me through the process of buying beef in bulk. Even small meat processing plants in Iowa turn out wonderful cuts of meat. I bought my first beef in this fashion when we lived in Iowa. Iowa is the land of row crops and meat with a capital “M”. Cuts that you find in the special meat case in a Wisconsin grocery store are what you would find in foam trays in the regular meat section of an Iowa grocery store!
Now is the time of the year to buy beef and other meats in bulk directly from the producer. People buy meat this way for many reasons: food safety, a vow to buy local, to support small farmers, economy, or just because it tastes better! It is important to me that my meat comes from one animal and that I know how that animal was raised and who processed it. This has become increasingly important with all the food safety issues that are arising. Buying beef in bulk also is still cheaper than buying beef at the grocery store and allows me to have cuts of meat that I wouldn’t normally buy because the high price.
Basically, this is how it works. You contact a farmer (who has a good reputation and uses a processor with a good reputation) who agrees to sell you beef. The farmer should be able to tell you what the average hanging weight of the meat will be so you have an idea of how many pounds of meat you will be buying. Either he/she or you find enough people to buy the whole animal’s worth of beef. Then the animal is transported to the local processing plant where it is killed, dressed, and the carcass is hung for a week or more before being cut. You pay the farmer the hanging weight of the meat at the current market price or the price agreed upon, which is sometimes higher than market price if it is grass fed or organic. You pay the processor the cost of killing, hanging, and cutting the meat when you pick the meat up.
The farmer should be able to tell you when the animal is going to the processor. You may want to ask the farmer if you can pick what breed of animal you are being sold. A milking breed, Holstein or Jersey, will be leaner and have a higher bone to beef ratio. A crossbreed or pure-bred beef variety will be fatter with a greater fat and meat to bone ratio. (I prefer a beef breed myself.)
The processor should call you when the meat is ready to be cut to find out your preferences as far as different cuts and the thicknesses of steaks and the number of steaks per package, pounds of hamburger per package, and the size of roasts. Some processors will have a checklist of cuts that they will go over with you when they call. Other processors will go with a standard number of cuts that they don’t state and expect you to ask for anything “special.” Be sure to ask questions. There are usually extra charges for making hamburger patties and extra tenderizing. You can also ask for cuts that are not listed, such as brisket, flank, ribs, extra soup bones, suet, heart and other organ meats, tongue, the ox tail, rib and arm roasts, and even dog bones! You paid for most of it as part of the hanging weight—you might as well use it!
There are also things you can ask the processor to do. If you cook with a crockpot, be sure to ask that they cut the roasts so they will fit in a crockpot. Be sure to tell them to give you only the best chuck roasts (there are only so many really decent chuck roasts in an animal) and make the rest into hamburger or stew meat. You can ask that certain cuts be run through the tenderizer twice rather than once (Swiss steak is an example of such a cut). If you are sharing a half, you may need to agree with the person you share with on the thickness the steaks will be cut. (I prefer ¾ inch.) You can also request that your roasts be boneless. Be sure to tell the processor how lean you want your hamburger (I ask for 10% fat—90% lean).
There are also trade-offs. If you order a rib roast, then you are giving up rib eye steaks; if you order a whole loin, then you are giving up fillet mignon steaks; if you order T-bone steaks, then you are giving up New York strip steaks and fillet mignon steaks.
Most producers and processors are honest, but here are some things to watch out for:
-
Keep track of what you order during that telephone conversation with the processor and make sure that you are getting those cuts when you pick up your meat.
-
If the quality and taste of the meat you buy is uneven, don’t go back to that processor. They are probably mixing “boxed beef” and selling the better cuts of the animal you paid for! You usually can’t prove anything, but you don’t have to give them any more of your business. Definitely don’t send anybody else there to be fleeced.
-
A pet peeve of mine is when the processor won’t give me the ox tail. Ox tail makes the best soup and some processors like to keep it and sell it themselves along with the more choice organ meat. I paid for the hanging weight of that ox tail, and by golly, I want it!
-
If all the meat you have ordered tastes gamey, a number of things may have happened. Someone put together your entire order from boxed beef, the processor didn’t scrape the carcass carefully, or the animal was ancient. You have several options: complain to the processor; make a lot chili, taco meat, and barbeque to mask the flavor; don’t go back to that processor or farmer again, or all of the above.
-
If the producer doesn’t conduct business in a timely fashion, let them off the hook and find another farmer to sell you meat.
Once you’ve bought beef directly from the producer, you will never want to buy it from the grocery store again! The quality is superior, the average price per pound is great, and the convenience of “shopping” from your own freezer can’t be beat. Begonia
0 Comments | Post Feedback |
|
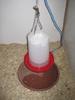
Chickens and Winter: Tucking in the Chicks
Monday, November 08, 2010
The temperature is really beginning to dip here on My Little Farm in Town. It is time to get the coop and yard ready for winter.
When the temperature dips below freezing, as it will tonight, the first thing I do is bring the water font from the chicken yard into the garage for the night. Then I plug in the electrically heated water font in the coop. I ordered it from Farm Innovators ( www.farminnovators.com ), and it was one of the best investments I’ve made—besides purchasing the girls themselves! It is not good for chickens to go thirsty at any time because it affects their laying, and I’ve already had my fill of frozen water buckets growing up on a hobby farm with no water hydrant in the barn. (I used to lug five-gallon buckets of water through thigh-deep snow, and it was so cold that when the water slopped onto my legs, it froze before it could soak my long underwear!)
I closed almost all the vents on the south side of the coop and blocked the east and west corner ridge vents with triangles of Styrofoam insulation board. One south vent is always open a little bit. Until the weather gets into the teens Fahrenheit, I won’t close any more vents. I will always have one vent open a little north and south. The chickens’ respiration is moist and rapid. They breathe out a lot of water that can condense on the inner walls of the coop, as well as on the chickens, if there isn’t enough ventilation in the coop. A damp bird has a hard time keeping warm and is liable to become ill.
My husband dug out and cleaned the storm window I salvaged to use in the coop. (Another window of the same size covers my cold frame.) He built up a frame for this window, which is basically a piece of glass with an aluminum edging, inside the main window of the coop so that there would be a three-inch air space between the two panes of glass. He used some butterfly clips to secure it and make it easier to install and remove. This window is warmer and brighter than the Styrofoam board that I had been using to insulate this window. My husband built the overhang on the coop to admit the lower angled rays of the fall and winter sun. The double-paned window has the added advantage of letting in sunlight and making use of solar gain on bright days.
I’ve already hung the 250-watt ceramic heating bulb screwed into a heating lamp hood in the coop above their perches. (I found it on a website that sold supplies for people who keep reptiles as pets.) I won’t plug this in until the weather gets into the teens. (I have to admit that I’ve used it when the temperature was in the low 20s (F) and a hen decided to molt at the wrong time of year—they are pets after all!)
When the temperatures get in the single digits and near or below 0 (F), I will set up the oil radiator on top of a couple of the thicker patio brick. (Putting any heater above the bedding lessens the chance of fire. Don’t use a heater with an exposed flame or electric bar—you risk losing your coop and all your stock.) It will heat the coop when the temperature really drops. People with bigger flocks don’t need heaters; the birds themselves heat the coop. I only have four gals. My girls will only raise the coop temperature 4 or 5 degrees and that mainly because my coop is so well insulated with R11 bats in the walls!
I start to get into the habit of checking the thermometer that I have in the coldest corner of the coop, and I make sure that my LED touch light on the wall just inside the door is in good working condition. The thermometer tells me whether my heaters are working or if they need to be adjusted. The LED light helps me read the thermometer during the dark of winter!
Another thing that I do to prepare for colder weather is bed the yard more heavily. I clear out the broken down and exhausted straw and use it to create new garden beds or add it to old beds as a feeding mulch. Any raw manure in the straw will be broken down even further by the harsh winter conditions. I pay special attention to the northwest corner of the yard that bears the brunt of the prevailing winds. I create wind breaks with slices of straw laid against the fence (see my November 6 blog: Chicken Nests and Windbreaks). The girls will almost always choose the outside to the inside, so providing a sheltered situation for them is important.
My last preparation for snow and frigid weather is to locate my big tarp for the chicken yard. I will tarp the yard at night or when a big snow storm is coming during the day. When the snow stops, we shovel off the tarp enough to drag it and the remaining snow out of the yard. This keeps the space relatively snow and ice free and allows the girls to be out most of the winter. I like to avoid cooping up the birds as much as possible. This prevents most pecking problems that come with boredom and crowding.
A lot of the things that I do to keep my birds healthy and comfortable are things that a person in a more rural situation probably wouldn’t bother with. In town, chickens tend to be viewed as pets, working pets but pets all the same. My neighbors enquire after the wellbeing of my girls when the weather is harsh. They ask if they are warm enough! We urban chicken ranchers also tend to have fewer of birds, which creates problems that people with bigger flocks don’t experience as acutely. Keeping your birds from freezing to death during a northern cold snap of -10 or -15F weather is more of challenge with a small flock! (Although last year during an early winter cold snap, some country folks with much larger flocks lost numbers of birds to the cold.)
Winter can be a tough time for the feathered ones and for the people who care for them. With a little foresight and preparation, a lot of its hardships can be avoided. Stay warm! Begonia
Images:
0 Comments | Post Feedback |
|
Chicken Nests and Windbreaks
Saturday, November 06, 2010
We are truly headed into winter. Last week we had cold, gusty weather. The wind came out of the northwest and chilled right to the bone. Some of the gusts topped out at 60 miles per hour. The chicks went out as usual, only retreating to the coop when it began to blow and rain.
When it stopped raining, I broke a bale of straw and lined the northwest corner of the yard with “slices” or flakes of hay. These were normal-size kicker bales, so each slice was about chicken height. I then laid a few flakes of hay in the middle of the “V” so the girls could scratch them up and create their own fluffy bed of hay to snuggle down into protected from the wind.
Being chickens, they just couldn’t resist all the possibilities in those flakes of hay lining the fence, so eventually they tore them up and stomped them down as well. I went out a couple of times that day when the wind was at its worst to kick the hay back up against the fence and bank the corners. (Another option might be to wire a few sheets of plywood into place, but we don’t have any to spare at the moment.)
Most days find the girls gathered in the corner nestled deep in the straw, their dark plumage soaking up what sun is shining. They are tough gals and enjoy being outside, especially when there is some protection from the wind. Begonia
Images:
0 Comments | Post Feedback |
|
Falling Off the Wagon: Homemade Donuts
Thursday, November 04, 2010
I really “fell off the wagon” on Halloween. All the kids were home, and I’ve been without an oven for almost six months now—so I decided to make apple cider donuts. I found a recipe on the web, bought a gallon of cider and a couple bottles of peanut oil, and we were in business.
There’s just something about homemade donuts (or fry cakes as they call them in this part of Wisconsin). I have fond memories of being surrounded by good food and siblings with the smell of deep frying in the air. One of my older sisters liked to experiment making different foods. One year she made rum-flavored donuts (Sounds weird but they were really good.) on Halloween. We were living out in the country and didn’t go into town to Trick or Treat, so we had a family party with lots of special food instead.
My grandmother made donuts and had the kids sell them door-to-door in her neighborhood. It was one of the many ways she made money to make ends meet during the Great Depression. She cooked them in a cast iron skillet on her kitchen stove. (I don’t remember her making us donuts as a child, but I do remember her peanut butter fudge!)
We all enjoyed the donuts and donut holes. Here is the website address in case you would like to make some yourself: http://www.homemadesimple.ca/en_US/homemavens.do;jsessionid=D7605220F6DBC1CEDF8E0DBD318CB7DB?contentId=oct07
Here is a whole wheat baked version if I’ve made you desperate for donuts (That would be a good name for a band, don’t you think?) and you don’t want to deal with guilt over the fat—although I’m sure the carbs in this recipe will make up for it! http://sunshinemom.blogspot.com/2009/10/baked-whole-wheat-apple-cider-doughnuts.html
Enjoy! Begonia
Images:
0 Comments | Post Feedback |
|
Collecting (Things of Little or No Value): Colored Glass
Tuesday, November 02, 2010
I’ve been collecting colored glass for years. I started out with small bottles and toothpick holders that I picked up cheaply at garage sales. I put them on the top of my sash window above the kitchen sink in the winter to enjoy their jewel colors when there weren’t any flowers to look at outside. Soon I filled the window.
I picked up the nucleus of my collection of larger pieces of colored glass at an estate sale outside of Osseo, Wisconsin, on an old farm. On the creaking enclosed back porch, I found a box of vintage jars that once held baked beans and other foods back when a product was known by the color and shape of the glass container in which it was packed. They were reasonably priced because nobody wanted them—nobody but me, of course. I held them up to the sun and enjoyed their colors and just had to take them home.
I’ve found a lot of glass at garage sales. Not the kind of glass, like carnival, cranberry, or cobalt, that people seek out and pay real money to acquire, but dime store footed candy dishes and gaudy bowls in olive green and turquoise. I laid down white Christmas minilights in part of the built-in hutch in my dining room and crowded it with all the colors of the rainbow. On rainy days or cold autumn evenings, I like to plug in the lights and enjoy the riot of hues. But this Aladdin’s cave of color is not enough.
I like to mix milk glass (more Things of Little or No Value that I collect) and colored glass in my living room on end tables and hearth. I burn tea lights in them and enjoy the glow while relaxing in the evening or entertaining.
I also add colored glass to my Christmas trees. I like the ornaments that look like multicolored wrapped hard candies. After years of picking them up at garage sales for a dime here or a quarter there, I can now decorate a small tree with them. Some years, I simply pile them in a glass dish and display them on a kitchen counter or sideboard!
The next time you are at a garage sale or in the basement of an estate sale, the bargain area of an antique mall, or the housewares aisle of your favorite thrift store and see one of these miracles of color, buy it and carry it home to brighten and lighten your spirits. Begonia
Images:
0 Comments | Post Feedback |
|
|