I participated in the 6th Annual Death by Chocolate event at my local public library this past weekend. (See my Feb. 21, 2010 blog, “Death by Chocolate.") Again guests were met at the door by a tuxedo clad volunteer. Live music played in the background as tasters sampled chocolate in all its forms—cakes, tortes, cheese cakes, brownies, cookies, candy, and even trifle. All this was made sweeter because this is a FREE event for the tasters! A generous supply of bottled water (stacked on a book cart!) was available to cleanse palates.
Each guest was asked to pick a category and taste the entire selection of that table before casting a vote. There were nine other entries in my category which included anything chocolate that wasn’t cake, cookies, cheese cake, or brownies.
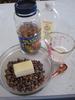
I had tried a new combination of truffle flavors (my usuals are almond, pecan, lemon, orange, rum, and peppermint) at Christmas time because I ran out of chocolate chips the day I was making candy to donate to the Friends of the Library Cookie Walk. I had picked up a number of packages of Nestles peanut butter and milk chocolate chips at my favorite surplus grocery store (at under a dollar per package), and I had some honey roasted peanuts in the house as well. So I used what I had on hand to create this new (to me) truffle flavor combo and called them Honey Roasted Peanut Butter Cup Truffles!
These truffles have the winning combination of salty and sweet PLUS chocolate and peanut butter! People seemed to like them, which resulted in my winning the People’s Choice Award in my category. Here is the recipe if you would like to make them at home. These truffles are easy to make and only require a few ingredients and a microwave.
Honey Roasted Peanut Butter Cup Truffles
8 ounces Nestles peanut butter and milk chocolate morsels (use a small food scale to weigh your chocolate)
¼ cup butter (I used unsalted butter.)
¼ cup heavy whipping cream
¼ teaspoon vanilla
¾ cup chopped honey roasted peanuts
Whole peanuts for garnish
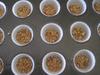
1. Place 24 candy cups in minimuffin tins
2. Spoon ½ teaspoon chopped peanuts into the bottom of each candy cup.
3. In a 2-quart microwave safe bowl, combine chocolate and butter. Microwave at 50% power for 1 ½ to 2 minutes or until melted.
4. Add cream and vanilla extract and beat with an electric handmixer until glossy and slightly thickened. Scrape the sides of the bowl occasionally.
5. Immediately ladle into paper candy cups.
6. Garnish with whole honey roasted peanuts and refrigerate until set up.
I like this recipe because I don’t have the mess of forming and dipping the truffles. I made (and washed dishes after) 5 or 6 batches of candy in the time it took for my VHS copies of Monolith Monsters and When Worlds Collide to play through from trailers to catastrophic conclusions. I broke even on materials because I won $15, which covered the $5 entry fee and the minimal expense of a few extra bags of chips and peanuts. My husband and I had a nice evening tasting great chocolate desserts and catching up with neighbors we hadn’t seen since the snow fell—and then we went out for a romantic dinner of salad! Begonia
Entertaining is becoming a lost art for many families. People are getting too busy for people. Or they are just “peopled out” by the time they get home and hit the automatic garage door opener. It is easier to watch television, surf the net (!), or play a video game than invite guests and prepare the house and a meal for them.
It can also be challenging to find one dish that pleases a wide range of ages and preferences. Add vegetarianism and food allergies to the mix, and it can be hard to figure out what to serve guests! The goal is for everyone to feel comfortable and satisfied at the end of the evening. Make-Your-Own personal pizzas are always successful.
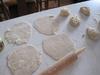
I start out by making the crusts. I have a very nice recipe for prebaked yeast crusts that don’t require any rising time and a minimum of handling. This crust freezes well and tastes great. I shared it with a friend who does once-a- month cooking, and it is popular with her large family. My daughter won reserve champion with this recipe at 4-H fair. It will be a winner with your guests, too.
Easy Pizza Crust
1 cup water, warm
1 teaspoon sugar
1 tablespoon yeast
1 teaspoon salt
1 ½ cups all-purpose flour
1 cup whole wheat flour
1. Combine water, yeast, and sugar and set aside.
2. Preheat oven to 350°F.
3. Combine rest of ingredients and add yeast mixture.
4. Stir well and turn out onto lightly floured board. Knead lightly until firm.
5. Cover dough with a towel and allow to rest for 5 to 10 minutes.
6. Divide dough into 12 pieces for personal size crusts or leave whole for a normal size pizza crust.
7. Roll out individual crusts and place on a lightly greased cookie sheet or pan dusted with cornmeal. Pierce with a fork.
8. Bake for 10-12 minutes, then remove crusts from oven, brush with oil, and add toppings.
9. Raise oven temperature to 450°F. Bake pizzas 10-15 minutes or until done.
Toppings:
Vegetables: Green peppers, mushrooms, onions, rehydrated sundried tomatoes, artichoke hearts, zucchini, lettuce, tomatoes, and spinach
Meat: Italian or Chorizo Sausage, Pepperonis, Canadian bacon (pineapple!), anchovies, chicken, meatballs, taco meat, hamburger
Seasonings: Italian seasoning mix, oregano, basil, garlic salt, sea salt, black pepper, red pepper
The crusts and toppings can be prepared ahead, giving you time get your house in order! Serve with a green salad and drinks of your choice and you have an occasion for the whole family to enjoy. Begonia
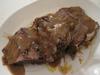
I learned this very simple method of preparing inexpensive beef chuck roasts years ago and have embroidered on it since!
Basic Beef Pot Roast with Vegetables
2-3 lbs. beef chuck roast trimmed of visible fat (dredged in a little flour salt and pepper and browned in a couple tablespoons of vegetable oil—or not—your choice)
1 envelope dry soup mix (Lipton, Knorr, or store brand onion, leek, or vegetable) or you can make your own by combining 2 tablespoons of beef broth powder with 3 tablespoons dried vegetables or minced dried onions.
I medium onion sliced and separated into rings
Three medium carrots and potatoes cut into equal-size pieces.
Place the onion rings in the bottom of a medium sized slow cooker and top with meat and sprinkle all with dry soup mix. Top with carrots and potatoes. Put lid on pot and cook on low for 6-8 hours. When done, meat falling apart and vegetables soft. Remove meat, potatoes, and carrots and keep warm. Use one of the methods of making gravy from my December 16 blog “Scratch Cooking: Good Gravy.”
Beef Burrito Filling
Follow each of the steps for making pot roast except add
1 tablespoon of chili powder
½ teaspoon ground cumin
¼ teaspoon garlic powder
1 small can of chopped green chilies or sliced Jalepeños
If you like some heat and a smoky flavor, add a few chopped ancho chiles in adobo sauce.
Omit the carrots and potatoes.
Remove meat from crock pot and chop or shred with a couple of forks, removing any bone, gristle, or visible fat. Return shredded/chopped meat to slow cooker and mix with juices and soft vegetables. Serve with warm tortillas with sides of sour cream, salsa, shredded lettuce, and diced fresh tomatoes.
Italian Beef Sandwich Filling
Follow each of the steps for making pot roast except add
½ to ¾ cup chopped green bell pepper
1/4 teaspoon garlic powder
1 and ½ teaspoons dried oregano
1 teaspoon dried basil
Omit the carrots and potatoes.
Remove meat from crock pot and chop or shred with a couple of forks, removing any bone, gristle, or visible fat. Return shredded/chopped meat to slow cooker and mix with juices and soft vegetables. Serve on hamburger buns or dinner rolls and topped with chopped yellow peperoncini peppers.
These are all excellent recipes for a quick meal when you get home from a busy day. The pot roast is a one-pot meal; just set the table. Serve the burritos with rice and refried beans. The Italian beef only requires a green salad to a make a balanced meal. Enjoy! Begonia
Cookies, Cookies, Cookies! I made Peanut Butter Blossoms today. The house is full of the smell of chocolate and peanut butter as I write this. The recipe and how-to follows:
I’ve been enjoying my oven and the extra time that I now have after the dust has settled on the holidays. My husband installed the oven in time for the absolutely necessary (to me) baking for Christmas events, such as 4-H caroling, gift wrapping, and game day at the local retirement community and toasting the crostini that always go with the Sundried Tomato tapenade that we bring to the Christmas Eve get together with my husband’s side of the family. There was no leisure to do the baking that I really enjoy.
It all started with my Betty Crocker Easy Bake oven back in the 1970s. I chose it from among many other possibilities out of the Sears catalog that year. There were a lot of us at 321 Pine Avenue, so it was easier for our parents to supply us with the Sears catalog and its extensive toy section and ask for a list for Santa rather than trying to surprise all nine of us!
Back then, the Easy Bake ovens looked like real miniature ranges and had 100-watt light bulbs inside that really baked food!
This oven came with some mixes and a real recipe book, so that a kid could be a scratch cook right from the start. Teacakes are still my favorite cookie. They were the first thing I baked in my Easy Bake Oven! Many years later, I bought my daughter her first easy bake oven hoping to recreate for her my experiences as a kid. It looked like a microwave—please! It never cooked worth a darn. She much preferred the real oven and real recipes (all my daughter's version of the Easy Bake came with were instruction for making mixes).
I sold my Easy Bake Oven at a flea market when I was a teen in need of some cash. We were never given allowances—times were too hard. I regret selling it to this day. Maybe one of these days I’ll find another one at a garage sale for a good price. (The ones I’ve found on the internet are more expensive than my new (to me) wall oven!) Begonia
So you’ve roasted that chicken or cooked that chuck roast in the slow cooker, now what do you do with those thin drippings and juices? You have two choices: Freeze and save them for your next pot of soup or make gravy tonight!
The easiest way to make gravy is by simply thickening those juices. The easiest was to thicken them is with cornstarch. When I have a guest who is gluten intolerant, especially, this is how I make gravy:
1. Stir together two tablespoons of cornstarch and ½ cup cold water. (The water must be cool or the cornstarch will clump into distressing little balls and not mix properly.)
2. Transfer the juices from the crockpot or roasting pan into a sauce pan. Skim the fat from the top leaving mostly drippings. Add broth if you don’t have at least two cups of drippings. (The broth can be made from a bouillon cube or powder added to warms or hot water.)
3. Add a third of the cornstarch solution (stir it up before adding) to the drippings. Turn up heat to bring mixture to a simmering boil stirring constantly.
4. Continue to stir as the mixture turns from milky looking to clear and thickening.
5. Continue to add cornstarch solution while stirring constantly until the gravy is as thick as you like it. If it gets too thick, thin it with a little water or broth.
6. You may want to add salt and pepper to taste or maybe some herbs depending on the type of meat. I use sage and parsley for chicken and thyme for beef.
I also use this method to make stir-fry sauce. When all the meat and vegetables are cooked, I push them to the sides of the pot and pour a cold mixture of broth, soy sauce, and cornstarch into the center of the pan and stir until it boils and thickens. Then I take it off the heat and stir to combine the sauce with all the other ingredients in the pot and serve over hot rice.
The other common way to make (medium) gravy is with two tablespoons fat and two tablespoons flour per cup of liquid:
1. Melt two tablespoons of fat (skimmed beef or poultry fat or margarine or butter or some combination of the two) in a sauce pan over low heat.
2. Sprinkle two tablespoons of all-purpose flour over fat, then stir or whisk continuously over medium heat until mixture is smooth and bubbly.
3. Take off heat and add cup of liquid (in this case, drippings, broth, bouillon or some combination of these liquids). Return to heat and bring mixture to a boil stirring or whisking continuously until thickened.
4. You can add a little more liquid if the gravy is too thick, or add some cornstarch solution if it is too thin for your taste. (If you measure the flour and fat carefully, you shouldn’t need to do either of these things.)
5. Add salt and pepper to taste or herbs depending on the type of meat drippings used.
A medium white sauce is basically medium gravy as shown above only you use butter or margarine rather than animal fat and use milk for all or part of the liquid. Add grated cheese at the end, and you have a cheese sauce. Add crumbled breakfast sausage or chorizo sausage, and you have biscuit and gravy sauce for breakfast. Add chipped beef, chicken, turkey, tuna, or salmon and some vegetables and herbs, and serve over toast or baking powder biscuits, and you have a lunch or dinner entrée.
For heavier white sauce, add more flour and fat per cup of liquid: ¼ cup flour and ¼ cup fat to 1 cup liquid.
For lighter white sauce, add less flour and fat per cup of liquid: one tablespoon flour and one tablespoon of fat to 1 cup liquid.
Cream soups and chowders can start from a light or medium white sauce base that is thinned to taste with more milk or broth. The cream soup made from such bases can be substituted in casseroles for canned cream soups. This can add up to quite a savings on the food bill over time if your family eats a lot of casseroles, soups, and chowders.
This last method of making gravy I discovered when cooking a nice lean pork loin roast on a bed of sautéed leeks in a covered Dutch oven. By the time the roast was finished, the leeks were pretty much mush. The pureed leeks and pan drippings with some added salt and pepper became the gravy! The pureed leeks thickened the juices wonderfully and made excellent (and in this case, low-fat and gluten-free) gravy. I have since used this method in other meat recipes where vegetables were cooked until very soft (as when you pressure cook or use a slow cooker to prepare a pork or beef roast). An electric stick hand mixer is very handy for pureeing in the cooking pan so you don’t have to use a food processor.
Now you are all set to make gravy, soup, stir-fry sauce, casserole, soup, chowder, or biscuits and gravy! Hope this helps you make some great meals and save money on your next trip to the grocery store. Begonia
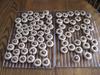
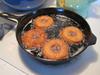
I really “fell off the wagon” on Halloween. All the kids were home, and I’ve been without an oven for almost six months now—so I decided to make apple cider donuts. I found a recipe on the web, bought a gallon of cider and a couple bottles of peanut oil, and we were in business.
There’s just something about homemade donuts (or fry cakes as they call them in this part of Wisconsin). I have fond memories of being surrounded by good food and siblings with the smell of deep frying in the air. One of my older sisters liked to experiment making different foods. One year she made rum-flavored donuts (Sounds weird but they were really good.) on Halloween. We were living out in the country and didn’t go into town to Trick or Treat, so we had a family party with lots of special food instead.
My grandmother made donuts and had the kids sell them door-to-door in her neighborhood. It was one of the many ways she made money to make ends meet during the Great Depression. She cooked them in a cast iron skillet on her kitchen stove. (I don’t remember her making us donuts as a child, but I do remember her peanut butter fudge!)
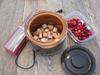
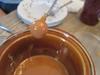
The friend who gave me the two-pound bag of fresh cranberries commented on how good they are eaten raw dipped in melted caramel. I’d never heard of such a thing! Cranberries are so tart that I’ve always put them on a par with eating rhubarb raw—I just don’t go there.
Yesterday, I was in the grocery store and on impulse bought a bag of Kraft caramels. I melted them in my smallest crock pot, and using a fondue fork, dipped a berry in the molten caramel. After letting it cool a bit on the fork, I tried one. It was the perfect mouthful—totally dangerous. The fruit was as crunchy as a good fall apple but more tart, which complemented the sweet richness of the candy. It was hard to quit eating them! Give them a try and I’m sure you’ll agree. Begonia
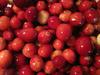
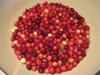
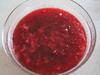
A friend of mine gave me a two-pound bag of locally grown cranberries this past week. (Did you know that 60 percent of all cranberries in the world come from Wisconsin?) Usually, I would have made cranberry bread or some other baked good with them. I still don’t have an oven, however, so I decided to make some cranberry sauce instead.
I had never made cranberry sauce before, so I turned to my extensive cookbook collection and ended up using a combination of a recipe from the Betty Crocker Cookbook I grew up with and a slightly more elaborate recipe from the 1977 Cranberry Cottage Cook Book from Nova Scotia!
It was very simple.
1. Take equal parts sugar and water and bring to a boil in a heavy pan.
2. Continue to boil for 5 minutes.
3. Add as many cups of cranberries as you have water and sugar and simmer for 5 more minutes, stirring frequently. (I also added minced, frozen orange peel and could have substituted orange juice for some of the water.)
4. You will hear the cranberries popping as they cook. How thick the sauce gets depends on how long you simmer and stir it. The cranberries are cooked after 5 minutes.
5. Additional simmering thickens the mixture, and it sets up as it cools. This sauce is chunky, but you could puree it in a food processor at this point if you want smoother sauce. (I used my trusty stick blender.)
I am a lover of lingonberry preserves, but they are very expensive and not easy to find. (They are a type of mountain cranberry that grow in Sweden.) I first tasted them at Al Johnson’s Swedish Restaurant and Butik (the one with goats on the grass-covered roof) in Door County, Wisconsin, on their famous Swedish pancakes and have been hooked ever since. ( http://www.aljohnsons.com/ )
What does cranberry sauce have to do with Door County, Lingonberries, and goats? Whole cranberry sauce makes a great substitute for expensive imported lingonberry preserves! (Actually, another neighbor who also got hooked on lingonberries at Al Johnson’s put me on to this idea.) We ate this homemade sauce on pancakes, and it was wonderful. The sauce had a fresh fruit flavor that you don’t get from canned, store-bought sauce.
Cranberries are being harvested now and will go on sale around Thanksgiving.Try making some fresh cranberry sauce this year–it is quick, easy, and delicious. Begonia
I thought about going to the grocery store this morning for donuts—gasp! I know though that if I go into the grocery store I will end up buying more than donuts. Most of you probably have more self-control than I can boast of. I always end up picking up a few more items than I went in for—list or no list.
You see, I love grocery stores and all the potential they hold. I even get into trouble in the outside aisles where we scratch cooks are supposed to do most of our shopping. The bakeries in most American grocery stores are on the perimeter!
I decided to be strong this morning and be my own grocery store. I practice the “pantry method” of buying food. I buy larger amounts when items are on sale or when I can get them cheaper in bulk. When I need something, I often “shop” from my own pantry.
Here is what we ultimately had for breakfast this morning, served with maple syrup, butter, and cherry pie filling!
Orange Bran Pancakes
1 cup all-purpose flour
2/3 cup whole wheat flour,
2/3 cup wheat bran
4 teaspoons baking powder
½ teaspoon salt
1 tablespoon minced fresh orange rind
2 tablespoons canola oil
1 large egg
¼ teaspoon almond extract
¾ teaspoon vanilla extract
2 cups milk
Combine flours, bran, baking powder, salt and set aside.
Combine orange rind, oil, egg, extracts and milk.
Add wet ingredients to dry ingredients and stir until just mixed.
Fry on lightly greased griddle or frying pan.
Makes about 24 pancakes.
These pancakes pack a wallop, you only need three or four and cup of coffee to feel full—maybe less if you are a light feeder. My husband ate SIX, but he has the metabolism of a blast furnace. (The cherry pie filling was his idea!) Enjoy! Begonia
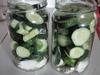
My dark literary roots are showing today! Didn’t a famous woman say, “You can never have too many cucumbers?” I spent all last summer trying to foil vine borers (unsuccessfully) and all last winter dreaming of cucumber salads and gently sweating jars of refrigerator pickles.
When I was offered my first paper grocery bag of cucumbers, the first thing I did (after saying Thank You!) was make the following recipe:
Sour Refrigerator Pickles
8 cups of small or thick sliced cucumbers
1 large sliced onion
2 large dill flowers (or dill seed)
1 ½ teaspoons dry mustard
3 or 4 cloves of garlic
½ cup sea, canning, or uniodized salt
2 ½ cups white vinegar
8 cups water
Layer cucumber, onion, and dill in a gallon glass jar or a number of smaller jars.
Combine the rest of the ingredients in a large pot and heat until the salt melts—no need to boil.
Cool brine before pouring over the contents of jar(s) and refrigerate. (If brine is warm or hot, it will cause the finished pickles to be soft—YUCK!)
You can begin eating these pickles whenever they taste good to you. If you don’t like garlic or onion you can leave it out. If you just want a garlic pickle, leave the dill out. This is a flexible and forgiving recipe and can be increased or decreased, as long as you keep the vinegar, water, and salt ratios constant.
This is not a canning recipe, so don’t even think about it :-) ! These pickles keep for a long time in the refrigerator. The onion and garlic pickle right along with the cucumber, so be sure to enjoy them as well. Begonia
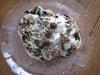
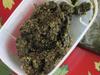
A friend of mine from up the block has a bumper crop of basil and has been sharing with me. (You pinch the tips of basil plants to encourage branching (and more tips!) and to hold off blossoming.)
Basil is like time—it waits for no one. If you accept a gift of basil, you have to use it or preserve it right away. The question is: What do you do with a paper shopping bag of basil?
You make pesto! Here’s the recipe that I use. It makes about 1½ cups.
Pesto
5 garlic cloves (peeled)
¼ cup pine nuts (or nut of your choice)
4 cups basil leaves (packed))
Salt (pinch or to taste)
½ cup fresh grated parmesan (don’t use the powdery stuff—it’s too salty)
Up to ¾ cup extra virgin olive oil
Puree in a food processor until all ingredients combine into a coarse paste. You may need to add more oil to get this consistency.
Pesto freezes well and keeps for a long time in my deep freeze (0°F). I pack mine into quart freezer bags and freeze flat. When I need pesto, I just peel back the bag, snap a piece off, and return the rest to the freezer.
I use pesto in many ways: mixed with cream cheese as a spread, on pizza crusts in place of red sauce, in spaghetti sauce added in the last few minutes of cooking, and stirred into hot and cold pasta.
If you are fortunate enough to be offered a lot of basil, don’t say no—make pesto! Begonia
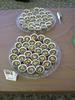
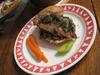
I participated in a Death by Chocolate Event (baking contest) at my local library last night. It was a very nice example of an activity that doesn’t cost much but really brightens the dull days between Valentine’s Day and Easter (which also involve large amounts of chocolate here in the United States). It was an adult event, so most of the people where there with their dates or friends. Over 200 people came to taste chocolate candy and baked goods and enjoy the Big Band music and an evening out.
The chocolate fumes alone were seizure inducing.
It was judged by one pastry chef and two chocolatiers, as well as by all the people who came to taste.There were 39 participants giving out samples in seven categories: professional, cookies, candies, brownies, cakes, cheese cakes, and hodge podge. Each category was judged by the public tasters and the professional s.One entry per category was allowed and each entry cost $5. The public could make a donation if they wished. Otherwise, tasting was free!
I entered what I called my Chocolate Raspberry Dream Cake and won the People’s Choice Award for Cakes.I was really surprised because I had entereda Chocolate Truffle Sweet Orange Marmalade cake in a previous year—It was a volcano of chocolate that I was sure would win—and failed to score. My entry this year had a vanilla icing on a extremely dark chocolate cake with raspberry preserves between the layers (I had made the preserves from the fruit of a dear friend’s raspberry patch).I had a relaxing afternoon putting it together and figured, I would have a nice evening visiting with friends and getting to know a few new people.
My personal favorite of the evening was a Tennessee Whiskey Bacon Truffle.It was flavored with essence of bacon—I never knew such a thing existed; yeah, I’m from the sticks—and a very fine aged whiskey. The combination sounded revolting to me, but I decided that trying something new was almost as good as a tropical vacation. First, I tasted chocolate, then the whiskey, then a smoky/salt flavor, and finally the fat of the cream—then it all mixed together. That woman took home a trophy.
One of my neighbors won the Judges Choice for Cakes. More Bacon! Again, it sounded odd but tasted fine. It was called The Elvis. It was a big, multilayer banana cake, with a layer of peanut butter and a layer of chocolate between each cake layer. The Icing was chocolate, and there was very crisply fried bacon sprinkled generously on top. The King would have approved. According to my neighbor, Elvis’s favorite sandwich, peanut butter, bananas, chocolate, and BACON, inspired this cake!
Here’s my recipe for Chocolate Raspberry Dream Cake.
Cake
½ cup cocoa (I used dark chocolate/dutched blend—your choice.)
¾ cup strong coffee (You shouldn’t be able to see through it, and it should be brewed from a dark roast.)
2 cups brown sugar
½ cup butter
2 eggs (I use the nice brown ones with the extra rich yokes that my hens lay for me—good girls!)
1 teaspoon vanilla
1 cup buttermilk
1 teaspoon baking soda
1 teaspoon baking powder
2 cups all-purpose flour
¼ teaspoon salt
Filling
2 cups raspberry preserves (Slightly warmed to spread more easily between the layers)
Icing
1 cup cold water
2 heaping tablespoons all-purpose flour
½ cup unsalted butter (8 ounces) (The unsalted butter gives the icing an almost cheese cake or cream cheese taste)
1 cup sugar
1 teaspoon vanilla
Instructions:
Preheat oven to 350F. Grease and flour baking pans.
Cake: Dissolve cocoa in hot coffee. Set aside to cool. Then cream butter, sugar, vanilla, and eggs. Beat in dissolved cocoa. Sift together dry ingredients and add to batter alternately with buttermilk.
Bake cake until it tests done (toothpick or cake tester inserted in middle comes out clean), about 30 minutes.
Filling: Warm preserves slightly.
Icing: Mix water and flour and bring to a boil, stirring constantly until it is thick and smooth. Put in a small bowl and cover with plastic wrap. Press wrap into top of mixture so there is no air space and cool. Scoop flour and water mixture into a larger bowl and add the rest of ingredients. Beat until thick, white, and fluffy.
Assembly: Cool cake layers in pans then turn out onto a cake plate, spread slightly warmed preserves between layers, coat top and sides with icing, and garnish top with shaved chocolate or raspberries or both. (Hint: I slipped my Raspberry Chocolove bar into my apron pocket while I cooked, and it was just the right temperature to make nice shavings when it was time to garnish.)
If you decide to make this cake, let me know how it turned out for you. Happy baking! Begonia.
Disclaimer: MyFrugalLife.com cannot accept any responsibility for any injury or damage that you may cause to yourself, others, or property when following any advice given on this site. MyFrugalLife.com has no control of how you may use information you get from this site and does not attest to the validity of any information found within. Much of this information comes from third parties (newsletter readers and other contributers). Use advice found in our newsletters and on our site with common sense and at your own risk. If you see something in our newsletters or on our site that you disagree with, please let us know. Our goal is print only valuable information and advice.