Chickens and Winter: Tucking in the Chicks
Monday, November 08, 2010
The temperature is really beginning to dip here on My Little Farm in Town. It is time to get the coop and yard ready for winter.
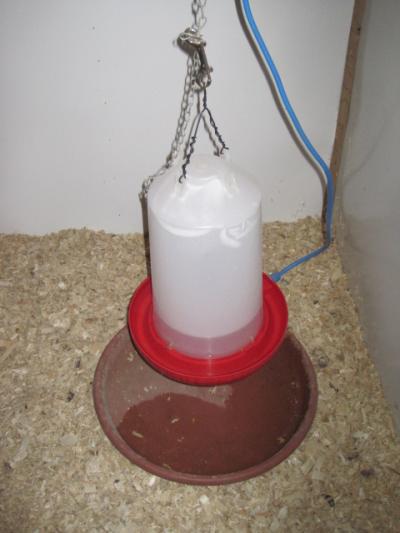
When the temperature dips below freezing, as it will tonight, the first thing I do is bring the water font from the chicken yard into the garage for the night. Then I plug in the electrically heated water font in the coop. I ordered it from Farm Innovators ( www.farminnovators.com ), and it was one of the best investments I’ve made—besides purchasing the girls themselves! It is not good for chickens to go thirsty at any time because it affects their laying, and I’ve already had my fill of frozen water buckets growing up on a hobby farm with no water hydrant in the barn. (I used to lug five-gallon buckets of water through thigh-deep snow, and it was so cold that when the water slopped onto my legs, it froze before it could soak my long underwear!)
I closed almost all the vents on the south side of the coop and blocked the east and west corner ridge vents with triangles of Styrofoam insulation board. One south vent is always open a little bit. Until the weather gets into the teens Fahrenheit, I won’t close any more vents. I will always have one vent open a little north and south. The chickens’ respiration is moist and rapid. They breathe out a lot of water that can condense on the inner walls of the coop, as well as on the chickens, if there isn’t enough ventilation in the coop. A damp bird has a hard time keeping warm and is liable to become ill.
My husband dug out and cleaned the storm window I salvaged to use in the coop. (Another window of the same size covers my cold frame.) He built up a frame for this window, which is basically a piece of glass with an aluminum edging, inside the main window of the coop so that there would be a three-inch air space between the two panes of glass. He used some butterfly clips to secure it and make it easier to install and remove. This window is warmer and brighter than the Styrofoam board that I had been using to insulate this window. My husband built the overhang on the coop to admit the lower angled rays of the fall and winter sun. The double-paned window has the added advantage of letting in sunlight and making use of solar gain on bright days.
I’ve already hung the 250-watt ceramic heating bulb screwed into a heating lamp hood in the coop above their perches. (I found it on a website that sold supplies for people who keep reptiles as pets.) I won’t plug this in until the weather gets into the teens. (I have to admit that I’ve used it when the temperature was in the low 20s (F) and a hen decided to molt at the wrong time of year—they are pets after all!)
When the temperatures get in the single digits and near or below 0 (F), I will set up the oil radiator on top of a couple of the thicker patio brick. (Putting any heater above the bedding lessens the chance of fire. Don’t use a heater with an exposed flame or electric bar—you risk losing your coop and all your stock.) It will heat the coop when the temperature really drops. People with bigger flocks don’t need heaters; the birds themselves heat the coop. I only have four gals. My girls will only raise the coop temperature 4 or 5 degrees and that mainly because my coop is so well insulated with R11 bats in the walls!
I start to get into the habit of checking the thermometer that I have in the coldest corner of the coop, and I make sure that my LED touch light on the wall just inside the door is in good working condition. The thermometer tells me whether my heaters are working or if they need to be adjusted. The LED light helps me read the thermometer during the dark of winter!
Another thing that I do to prepare for colder weather is bed the yard more heavily. I clear out the broken down and exhausted straw and use it to create new garden beds or add it to old beds as a feeding mulch. Any raw manure in the straw will be broken down even further by the harsh winter conditions. I pay special attention to the northwest corner of the yard that bears the brunt of the prevailing winds. I create wind breaks with slices of straw laid against the fence (see my November 6 blog: Chicken Nests and Windbreaks). The girls will almost always choose the outside to the inside, so providing a sheltered situation for them is important.
My last preparation for snow and frigid weather is to locate my big tarp for the chicken yard. I will tarp the yard at night or when a big snow storm is coming during the day. When the snow stops, we shovel off the tarp enough to drag it and the remaining snow out of the yard. This keeps the space relatively snow and ice free and allows the girls to be out most of the winter. I like to avoid cooping up the birds as much as possible. This prevents most pecking problems that come with boredom and crowding.
A lot of the things that I do to keep my birds healthy and comfortable are things that a person in a more rural situation probably wouldn’t bother with. In town, chickens tend to be viewed as pets, working pets but pets all the same. My neighbors enquire after the wellbeing of my girls when the weather is harsh. They ask if they are warm enough! We urban chicken ranchers also tend to have fewer of birds, which creates problems that people with bigger flocks don’t experience as acutely. Keeping your birds from freezing to death during a northern cold snap of -10 or -15F weather is more of challenge with a small flock! (Although last year during an early winter cold snap, some country folks with much larger flocks lost numbers of birds to the cold.)
Winter can be a tough time for the feathered ones and for the people who care for them. With a little foresight and preparation, a lot of its hardships can be avoided. Stay warm! Begonia
0 Comments
Storm Window in My Coop
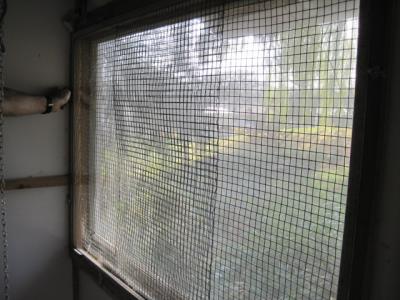
Notice the 3-inch gap between the inside and outside panes. You can also see the butterfly latches that make installing the window easy.
Heated Waterer
Heat and Insulation
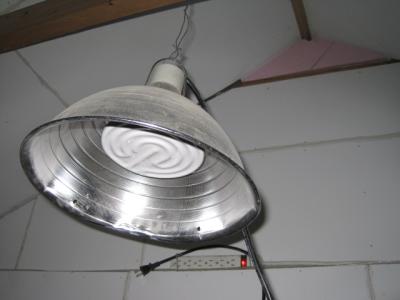
The Styrofoam blocking the ridge vent is just pushed into place. Once cut, they should last for years if you are careful. (You might want to hold it in place with a nail--your birds will eat the Styrofoam if they can get at it.) You can also see my ceramic heat bulb in a regular heat lamp reflector. Always use a lamp that is ceramic where you screw in the bulb or you could have a fire.
|