Removing polyurethane spots from a painted wall...
Friday, November 30, 2012
Made a wonderful discovery today. While searching the internet to find out how to remove orange polyurethane spots from my kitchen wall, I came across a post about removing polyurethane from a tub. I wondered if their tip for the tub would work on a wall, and it my case, it did! First of all, my walls are painted in semi-gloss paint, so that might make a difference on whether or not it will work. They advised to use a razor scraper to gently scrape the polyurethane off the tub, so I tried it on my wall. It worked!!! I have been looking at those awful spots for probably a year, and finally decided to try to remove them again. I tried Mr. Clean sponge, scrubbing cleansers. Goo Gone, finger polish remover, and a slew of stuff, so I was delighted this worked. I was gentle and scraped with the edge of the blade. Hope this helps someone else! :)
0 Comments | Post Feedback |
|
Litter box from storage box container tub
Saturday, January 22, 2011
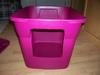
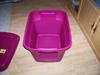
I was needing a litter box with higher sides than I owned. I already had the Jumbo sided litter box, but was still having a problem with spillage above the top of the box. (Is that a nice way to put it? lol.) None of the litter boxes I saw in stores were tall enough, or had two pieces that fit together as a covered litter box. As my friends had told me, they can still get fluid through the tiny cracks where the top and bottom fit together. So I decided to try using the storage box container tubs that you can get for less than $5.00 at a large retail store. I had to be sure it didn't have large grooves or details sticking up in the inside of the container as some of them do.
Using a hot knife to help cut through the plastic and a heavy utility knife. *Be very careful; very easy to cut yourself, I cut the shape out of the front. I traced with a pencil where I wanted to cut before cutting, that way I could get it halfway straight. (Used a folded piece of paper as a template.)
The cats adjusted to it well. I leave the top off. Mine aren't used to a covered box.
Images:
0 Comments | Post Feedback |
|
Stamp pad and ink storage using cd case inserts
Saturday, January 22, 2011
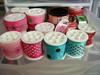
Here is a stamp pad and ink storage container that I made using the inserts from cd cases. I just hot glued them together with a hot glue gun, until I got the size I needed. Be careful though, hot glue hurts when it gets on your skin. (Ask me how I know. lol!) I should have worn gloves.
I got the original idea from a poster on www.Splitcoaststampers.com named SewItSeams . She took the thin jewel cases themselves and glued them together to make inkpad storage. I had to have my jewel cases, but I had tons of inserts leftover from the regular cd cases to use, so I changed the idea to use the inserts. Needless to say, hers turned out much prettier than mine, but mine is still functional. I hotglued some messed up cds inside also for stability, and to get them out of my way.
Images:
0 Comments | Post Feedback |
|
Reuse or recycle thread spools as ribbon organizers.
Saturday, January 22, 2011
I finally thought of a way to store my loose ribbon where I could see them easily. I had been saving all my empty thread spools, with the intention of using them to make ornaments with felt and little wooden heads, but then it occurred to me today to use them to store my ribbon. I had tons of them, so it worked out great. I actually had just enough to store what I had. I just used Scotch Magic tape and adhered them to the spool, then twisted them around it, and attached a piece of magic tape to keep them in place. For some of the thicker ribbon, I had to use regular tape, but I only had a few of those. You could also use straight pins to adhere them, but that wouldn't be safe with pets or kids. Also, I didn't want holes in my ribbon.
A lot of my ribbon is smaller pieces like a foot or so. I left the cardboard spools of ribbon alone. They work perfectly already.
Images:
0 Comments | Post Feedback |
|
Reuse Recycle Emery Cat Scratcher
Monday, May 10, 2010
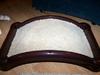
Reusing Recycling Emery Cat Scratcher
I recently purchased the Emery Cat Scratcher. I threw away the cardboard insert, as the cats were'nt the least interested in it, and I was worried they would pull out a nail. I bought carpet pieces/rugs at the dollar store and cut them to fit into the Emery Cat Scratcher.
Supplies Needed:
Carpet Pieces (not loop-styled, as cats can get their nails hung on the loops.)
Utility Knife
Hot Glue Gun
Glue sticks for glue gun
Catnip
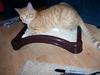
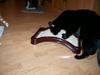
I measured and cut the carpet pieces to fit. Be careful with utility knife. You might want to put a rolled newspaper underneath while cutting. (I have a nice gash in the floor now. OOPS!) Then I applied hot glue to the scratcher and pressed the carpet down firmly. Then I tugged on the carpet to be sure it was secure. I sprinkled it with catnip, and then the kitties tested it and gave it their approval.
Images:
1 Comments | Post Feedback |
|
Another use for cat dog pet food bags
Monday, April 19, 2010
I used some pet food and litter bags this week as weed blocking plastic. Just pulled the bulk of the weeds, laid down the bags (with the bottoms cut out and opened) and covered with mulch.
0 Comments | Post Feedback |
|
Use for mulch and potting soil, dirt bags
Monday, April 19, 2010
I worked in the yard this week, and realized a great way to use the bags that mulch or soil come in, is to cut them up and use them as weed blocking plastic. I dumped the mulch into a large storage bin that I had outside, cut up the plastic, laid it out and then covered with the mulch. As the weeds have taken over this past year, this will be a lot of help.
4 Comments | Post Feedback |
|
Cheap inexpensive cat dog house shelter igloo
Thursday, April 15, 2010
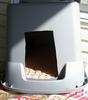
Having several cats that needed a place to sleep that was their own, I adapted a Sterilite storage container into a little shelter for them. *Please note-These have to be in a protected area that does not get rained upon or wet or harsh weather. They are not waterproof. Water will collect and get into them if not stored in a roofed or dry area. We currently keep ours in our storage room that is in our carport. The door to the carport has a square opening cut out, so that the cats can come and go from the sheltered area as they please. We have ours sitting upon brick landscaping squares to keep them off the floor and protect them even more from moisture. They do have small plastic grooves in the bottom, so we are sure to insert cedar chips, foam bedding, towels or fleece to keep them comfortable. All you do is cut an opening into the front of the sterilite container. This is the hardest part. *Caution: Be VERY CAREFUL! It is really easy to cut yourself when trying to cut an opening in plastic this dense. The plastic is very hard and difficult to cut. I used a box cutter and a flat screwdriver to create the opening. If you know someone handy with tools, they may have an easier way to create the opening. After creating your opening, reattach the top, flip the container over (top on the bottom), and you have a cheap little shelter. I don't think are substantial enough for a shelter in and of themselves, but they do help. Then we insert some bedding, and the cats/dogs/pets have a nice place to lay. I have another post where I post how to make a pet bed/bedding from an eggcrate mattress cover or foam. Pets seem to like this. (Just make sure they are the type to try to eat their bedding!)
While the one I have pictured looks very crude. It is functional. In fact, this winter, we purchased the warming mats that warm when laid upon by the pet. We put them into the plastic containers with nothing else in them, and snaked the cord out the back. They worked fine. I have found the storage containers for five dollars or less. I make sure that I get a good sized one, where they can stand up comfortably, but small enough to conserve some of their body heat. I also take duct tape in the winter, and duct tape a piece of thick fabric or fleece etc... to the front with a slit cut in it to block some of the cold air.
Images:
2 Comments | Post Feedback |
|
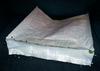
Pet bed...recycle reuse eggcrate foam mattress cover
Thursday, April 15, 2010
I cut two pieces of eggcrate foam the same size. Then I cut out a strip of fabric large enough to sew into a pillowcase large enough to enclose the foam. After inserting the foam into the pillowcase shape, I then used quilting thread and stitched up the ends. I wanted to use a different thread and one that is easy to see and remove, as I will remove the stitching should I need to wash it. I could have also used sewable velcro or snaps, but figured the quick basting was easier.
Please Note* If you pet is the type that likes to try to eat his bedding, foam is not a suitable material to use for their bedding.
The eggcrate foam is great for reusing to make seatcovers for outdoor chairs or table chairs, pet beds, etc...
Images:
0 Comments | Post Feedback |
|
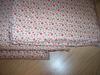
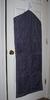
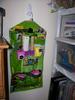
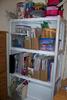
Hanging Organizer
Wednesday, February 03, 2010
I made this hanging organizer from reduced fabric, that I got for a dollar a yard. It is a heavier and stiffer fabric than most, so it is more sturdy. The only supplies I needed was a hanger, fabric, sewing machine and thread. I cut two large pieces the same size, and 7 smaller pieces for my pockets. You have to figure how many pockets you want, what size, as for what you will be using them for. First I sewed a hem along each of the sides of the two large pieces, then I made a hem along each tops and bottoms. Then I hemmed the edges of the pockets pieces. I had to sew pleats into some of my pocket pieces, as I cut the fabric too long. Then I sewed the pockets onto the pieces, making gathers along the bottoms of the fabric to allow more room. Be sure not to make your pockets too loose, or they will hang or droop excessively. I then stitched down the pockets to make the pockets divided. *Note-be sure to sew from the bottom of the pocket to the top or else the fabric will pucker badly. After finishing the pockets, I folded down the top and pinned and inserted the hanger. I removed the hanger and sewed the tops together to make the opening for the hanger. I then inserted the hanger, pinned the two sides together and made sure to stitch a line underneath the hanger to keep the hanger from falling down into the center of the organizer. I then stitched the sides and bottom and was finished. Mine is far from perfect, but as long as it is functional, and I can stand to look at it, it is fine. haha. I think it would make a good shoe bag, sewing supplies bag, scrapbook bag etc... It has freed up some room on my desk, by being able to put supplies that are'nt always necessary in close proximity.
http://i49.tinypic.com/25gqbtt.jpg
http://i46.tinypic.com/154bo6f.jpg
Images:
0 Comments | Post Feedback |
|
Swiffer Cozy Pad Cloth Replacement
Monday, January 25, 2010
I recently made a Swiffer Cozy for my Swiffer to replace the dry swiffer cloths I buy. I think it qualifies as the ugliest Swiffer Cozy ever, but it used up leftover yarn I had and, it is very functional. I just measured the size of the bottom of the swiffer, and crocheted enough to cover that space, then added the top sides to go over the edges; making one side smaller than the other, so as to be able to slip it on easily. While it is ugly, it works great! Best of all, when I am done, I shake off the dirt, toss it into the wash, and I do not have to keep buying the swiffer cloths and tossing them into the trash.
http://i46.tinypic.com/2uggujb.jpg
I hope to also make a mopping pad for my Clorox ReadyMop; using either cotton yarn or by sewing one with different materials.
0 Comments | Post Feedback |
|
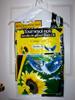
Recycled Birdseed or Pet Food Bag Wrapping Paper Organizer Shoe Bag etc...
Monday, January 25, 2010
I made another project from some recyled bags. These came from empty bird seed bags that a friend gave me. They are colorful and the pretty birds made them nice and bright. In fact, I had so much paper, that I had to make two. Helped free up some space in my closet.
http://i47.tinypic.com/bdquz9.jpg
http://i48.tinypic.com/14acw2x.jpg
http://i50.tinypic.com/35jmjpw.jpg
http://i49.tinypic.com/t8vhfr.jpg
http://i47.tinypic.com/28chsfs.jpg
On the one side, I put lots of spots for rolled paper, and on the other side, I put exculsively pockets for gift bags and boxes. I did not have to worry about putting any cardboard or supporting materials in the inside or the pockets, as the weight of the boxes and paper kept it very supported. So the only materials I needed were two bags for each project, some thread and a hanger for each. I plan for my next projects to be a much longer organizer for a door and more bags. I might possibly use some to cover a cat litter box to use for a trash receptacle in my craft room. I am also going to be working on covering some more cardboard boxes with leftover calendar pages to make more paper storage for my scrapbooking. I am going to see if the spray adhesive will work for the thinner calendar pages.
I like that this is virtually a free project, and that it keeps these bags from going in the land fill. While it is impossible to use all of them, I like that I save a few. I cannot believe that these companies do not find a way to reuse these bags. There are a lot of containers that can be reused. I know one company, Terracylce (not endorsing, just mentioning) reuses containers, and I wish more companies would do the same. For one, plastic kitty litter containers could be reused indefinately (the heavy Tidy Cat ones). I know they make great buckets.
Images:
0 Comments | Post Feedback |
|
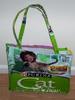
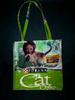
Recycled Cat Food Bag Scrapbook Punch Organizer
Monday, January 18, 2010
Today I used the Duraweave Bag from the Purina Cat Chow to make a recycled organizer. I love reusing things! The tools I needed was a bag or two, plastic placemats or cardboard, a small child's clothing hanger, sewing machine and thread. I also had to hand sew a small piece with a large plastic canvas needle, as my sewing machine did not like sewing through so many layers and threw a hissy! I used the plastic placemats in the back of the bag to insert into large pockets I had made. This was to add some stability to the bag, and so it would'nt bow inward from the weight of the punches. I did make a few of my pockets on the small side, so I had to just slip a couple of my punches over the edge of the pocket, but it worked. So I am happy.
Here is a pic:
http://i47.tinypic.com/2j1rfgz.jpg
Images:
1 Comments | Post Feedback |
|
Recycled Cardboard Box Paper storage or Craft and Sewing Storage or Scrapbook Storage
Saturday, January 16, 2010
I have had trouble figuring out how to store my paper. A friend cut out a storage container for her paper using shipping boxes and boxes from kitty litter etc... While searching the internet, I came across a blog where someone had step-by-step instructions for making a fabric covered box. Instead of hot glue, I mixed some Elmer's glue with a little water and painted the box with it and attached the fabric. After drying, it was ready to use. I changed the covering on the last ones I made; I covered them with used calendars from the previous year. Great way to recylce and saves my fabric for other projects. I used ModPodge to attach the calendar paper, but I assume glue would work also. One word of caution; thin calendar pages do not work well; needs to be a little thicker, or it will wrinkle and pooch out in spots. Here is a link to the blog this kind person posted on the web. I am so appreciative to her for posting this.
http://pinkandpolkadot.blogspot.com/2008/11/recycled-magazine-holder.html
0 Comments | Post Feedback |
|
Plastic Shelving Unit for Scrapbooking
Saturday, January 16, 2010
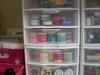
Needing more storage for scrapbooking paper and supplies? After drooling over the pretty scrapbooking rooms some people shared on the internet, I looked for a solution for housing all of my craft, scrapbooking and sewing supplies. I came across a $23.00 plastic shelving unit at the department store (like the kind people use in their garage or for food storage in a pantry.) It worked perfect. The only tool I required to put it together was a rubber mallet. The shelves even had room for my sewing machine on the bottom shelf. Although, not as fancy as built-ins, wooden bookcases or custom purchased products; it is very nice and clean, functional, and gives me lots of storage. http://i47.tinypic.com/2n0796f.jpg
I am still in the process of covering the cardboard box paper holders with old calendars, fabric etc..
Images:
0 Comments | Post Feedback |
|
Size of straps on Recylced Cat Food Bag
Thursday, April 30, 2009
I would probably change the size of the straps in my previous article to 3 inches wide x 27 inches long, as the straps I made on another bag using the 1 1/2 -2 inch measurements were skinny straps. You can also zigzag around areas, such as where the straps are attached for extra durability.
0 Comments | Post Feedback |
|
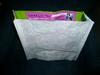
Recyled Cat Food Bag
Thursday, April 30, 2009
I looked on the internet and tried to find a four sided bag using a cat food bag, and was unable to find one. I finally figured out how to put one together and wanted to share it.
Materials needed:
One Washed, Dry Purina Cat Food Bag or other bag made with DuraWeave.
Thread
Scissors
Large Sewing Needle/Sewing Machine
Straight pins
*I used a size 16 needle on my sewing machine. Please use a large machine or hand sewing needle, as a small needle could break possibly ruining your sewing machine or causing injury.
** Please do not give this bag to small children or children under 3 (or allow them to play with this bag), as the handles are a hazard to small children
Lay your Bag flatly on the floor. Cut out the following pieces, being sure to center your design for the front and back.
Cut two-13 1/2 x 14" long pieces. This will be the front and back.
Cut two- 3 1/2 x 14" long pieces, this will be the sides.
Cut one 3 1/2" x 14" piece. This will be the bottom.
Cut two 1 1/2 to 2 inches wide x 27" long (or desired width and height), this will be your straps.
First you sew the all the side pieces together. Lay right sides together (printed side) and sew a straight stitch down the bag. Do this for all four sides; until all of the sides of the bag are sewn together. When finished with these steps, you will have a bag body, minus the bottom, that is inside-out. Next pin right sides together of your bottom piece to all four sides at the bottom of the bag. When completed you will have the entire body of the bag, inside-out. Now, turn your back right-side out. Hem a seam along the top of the bag, turning the top under just an inch or so. Then you will need to push the outer edges together on each edge of the bag, pinning in place. Stitch reinforcement stitches down each side of the bag and each edge of the bottom. This reinforces the bag and causes it to be able to stand up. Next take one strap piece, fold one edge of the piece over just about a third, stitch in place. Then fold the other side over and let the edges meet in the middle and fold once more so that the one edge peeks out just a little to make a nice strap. Pin and stitch into place. Sew the other strap. Then just sew your straps onto your bag, by placing them where you want your straps to be located.
To make your straps very secure, you can sew them in a downward position, and then sew them in the upward position using a box shape and an X shape to make them extremely sturdy. (Note-this probably is'nt necessary, unless you intend to carry very heavy items, and it is really difficult to sew through that many layers of the Duraweave. It would probably break any sewing machine needle. )
And when you are done, you have a nice bag for scrapbook paper, frozen goods at the grocery, art supplies, coloring books etc...
Images:
4 Comments | Post Feedback |
|
|


