After continuously trudging through loads of craft tiny bits and feeling guilt every time I walked upstairs past the first room- the loft which was my Craft Room- I decided to dedicate the loft for reading for my kids (ages 2 & 3).
See, the Craft Room was organized one minute, then a disaster the next. Basically, the Craft Room had to die because it was just out of place, and it was given too much space to live in, so it was easily unconstrained or rather I was given too much space for my crafts so I took advantage of that to the max- and since it was a whole room to use, I left little project after project unfinished and thus a mess!
ANYWAY... The Reading Room is a great cozy place for my young children to look at books, and a neat sitting nook for me to read to them in.
Books neatly on a children's book shelf, a Cracker Barrel rocking chair, a glider with its gliding ottoman, and a nice fleece blanket spread on the floor for comfort all come together as the Reading Room. This room, to me, calls to share loving memories and bonding time.
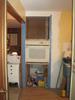
That gaping hole in my kitchen wall is now partially filled with a new (to me) oven! Well, it is actually a gaping hole in my kitchen and living room walls. My husband had to widen the opening by 5 inches to accept the bigger, newer oven and in the process had to remove paneling and move the living room portion of the wall by 5 inches as well. Nothing is ever simple.
I had found the oven about 3 years ago at a rummage sale in the parking lot of the Zwingli UCC. The oven was five years young and just about clean as a whistle. It cost me $25, and guess what? It works just fine and is self-cleaning to boot!
My old wall oven lost the victory about six months ago. We could have bought another heating element for $35, but why throw good money after bad when we had a perfectly good oven sitting at the bottom of the basement stairs? The old oven was at least 40 years old and 50 degrees off. My “new” oven preheats promptly and heats to whatever temperature I set it.
I used a wide array of small appliances to fill the gap while I waited for my new oven to be installed: crockpots, rotisserie, pressure cooker, bread machine, big Nesco cooker, and microwave oven and, of course, the outdoor grills! It only got tiresome when the cold fall weather hit, and I found myself planning meals and grocery shopping only to remember at the last minute that I didn’t have an oven!
The new oven was worth the wait. (I had urged my husband to finish the bathroom remodel before starting a new project.) Now I have a nice new bathroom/laundry room AND a new oven! Can’t wait to start baking Christmas cookies! Begonia
I was chatting with my husband as he grouted the shower last Saturday. He’s been remodeling one of our bathrooms for the past year.
It is slow going because he is on the learning curve for some tasks, such as wiring, and it just takes time to find materials at garage sales (recessed lighting fixtures $10, new faucet $15, floor tile $10, and paint $5), liquidators (toilet paper and towel holders $3 each), and the Habitat for Humanity ReStore (sink $10, a new window $40, and tile for the shower $36). We did buy a few things, such as a small piece of counter (on sale at Menard’s) mastic, grout, insulation, and ceiling and cabinet paint (cheap from Walmart). We will put the money saved into a nice water-saving toilet.
Time is also precious. That is another reason why these projects take a while to complete. First, we work to pay the bills, then we work on home improvement projects.
I noticed that he was using my pink dust pan to hold the grout and then would push its edge against the wall beneath where he was working with the grout. I commented on his creative use of cleaning equipment, and he said that he’d been wasting a lot of grout until he had “repurposed” the dust pan. I’m glad I married such a clever, hardworking, and handy fellow! Begonia
This was the conversation my husband had with a village utility worker early this morning.
After a windy night, I discovered a broken branch on the sugar maple on the south east corner of our patio. I mentioned it to my husband, and he said he’d get to it. I had almost decided to grab the saw and take care of it myself because of what a busy time he’sbeen having in our home business, only to see him out with the pole saw trimming the tree.
Once he took down the broken branch, we started noticing others that now had to go. One of these branches was partially draped over the wire that brings electricity to the house. We both thought it would slide harmlessly down once the bottom was cut. Of course, it didn’t!
I wanted to put a rope on it and pull it aside as he finished the cut. My hubby wanted to use the lopper attachment on the pole saw to cut away the end of the branch draped on the wire. Of course, we didn’t have a ladder handy, so he climbed up one of the plastic web patio chairs. I commented that he was awfully close to the power line. He replied, “This pole saw has a fiberglass handle, it’ll be fine!” Teetering on the outer metal edges of the chair, he extended the saw, the picture of the hapless homeowner doing something dumb and dangerous. (We’ve all been in this type of situation at some time in our home owning careers—if we are honest enough to admit it!)
The first cut went well. It still wasn’t enough to raise the branch above the wire though. By this point, I was just keeping my mouth shut. (He was going to do what he pleased no matter what I said.)
The second cut was another story! I couldn’t see the placement of the lopper, so I passed under the branch and wire to get a better view. I had just cleared them both when—that’s right— a SHOWER OF SPARKS started falling all around me.I’m sorry to say that a few choice phrases burst out of me in my fear and anxiety.
The insulation on the power wire was nicked, but no one was hurt. We were more fortunate than we deserved. The moral of the story is. . . whether your equipment conducts current or not,don’t get it or yourself anywhere near live power lines! Begonia
We got new neighbors as of 5 days ago. Just as our luck with neighbors, there are some problems already....well one problem. Sometimes they are so loud. They sometimes have their bass to there stereo up so high I can hear it very annoyingly in my house. Sometimes I can hear them talking or whatever because our bedroom is right next to their porch and living room. If the bass was turned down a little bit, even if I could still hear it, it would be better. I think its the kids, because the parents had just left and then the bass started a little while ago. So, Seth is going to mention it the next time he sees them. I just don't want problems with them, and don't want to come off rude or confrontational at all. I would just like to be curtious mindful mind your buisness type neighbors with each other.
Savanna went pee pee on the potty yesterday for the first time.
Seth got the bolt off the car but then realized that one of the four brake pads was faulty and had to take them back to get new ones. Stuck again for now.
It will just always be something. I am trying to just get through one thing at a time.
We recently bought a foreclosed house that needed a lot of work. We also still have another house that hasn’t sold, so we didn’t want to shell out a fortune on kitchen counters - I’m opting for a really nice master bath first! The cabinets in the kitchen were standard builder’s grade oak. The counter tops were beige laminate. Nothing horrendous – just boring. There was a hideous tile border at the back of the counter that I ripped out. The house is only about 12 years old. The previous owners had painted it dark green and then sponge painted over it, which didn’t do the counters and cabinets any justice at all. We painted it yellow. Here is a before picture and a picture once we painted.
We talked about re-laminating the counter tops, but I wasn’t really in love with that either. After a fair amount of online research, I figured out that lots of people were painting their laminate counter tops — yes, I said painting their counter tops. Most of the ones I saw involved a sponge painting technique and some other creative painting. Here are some of the interesting ones that I found (mind you, I also saw some horrible ones)!
I’m really crafty, but I was worried about all that sponge painting — mostly based on the ugly ones I had seen. Google painted laminate counter tops. You’ll see what I am talking about. After some experimentation on the laundry room counter top, here’s what I ended up doing:
I SANDED THE LAMINATE AND WOOD EDGES – NOTHING SERIOUS JUST A LIGHT SAND
ROLLED ON 1 COAT OF GRIPPER PRIMER
AFTER THE PRIMER DRIED, I ROLLED ON 1 HEAVY COAT OF WHITE 1 PART EPOXY ACRYLIC GARAGE FLOOR PAINT MADE BY BEHR AND COVERED EVERY INCH OF THE PAINT WITH PAINT CHIPS (RIGHT NEXT TO THE GARAGE FLOOR PAINT, THEY HAVE PAINT CHIPS THAT ARE USED TO ADD TEXTURE TO THE GARAGE FLOOR. I GOT THE TAN MIX AT HOME DEPOT)
LET THAT DRY AND THEN WIPE OFF ALL OF THE EXCESS PAINT CHIPS (I SAVED AND REUSED THE ONES I WIPED OFF)
(EPOXY PAINT TAKES A LITTLE WHILE TO CURE COMPLETELY – I THINK WE LET IS SET 2 DAYS, BUT IT FELT DRY TO THE TOUCH AFTER JUST A FEW HOURS)
THEN WE DID A SEAL COAT OF EPOXY GLAZE — IT’S THE ONE AND ONLY BRAND OUR LOWE’S HAD BUT FROM WHAT I’VE READ IT’S JUST LIKE THE ENVIROTEC EVERYONE IS ALWAYS TALKING ABOUT – WE BRUSHED THE 1ST COAT ON W/ SPONGE BRUSHES THEN DID A POUR ON COAT THE NEXT DAY.
MY EXPERIMENTAL COUNTER WAS IN THE LAUNDRY ROOM AND I USED A CHOCOLATE BROWN BASE W/ THE CHIPS — IT WAS WAY TOO DARK. ANYWAY, I COATED IT W/ 5 COATS OF POLY, BUT NOW THAT I’VE SEEN THE EPOXY GLAZE, THERE’S NO DOUBT THE EPOXY GLAZE LOOKS THE BEST. IT GIVES IT THAT DEPTH THAT GRANITE TOPS HAVE. THE BRAND WE BOUGHT SAID IT WAS LIKE ADDING 50 COATS OF POLY — I DON’T KNOW ABOUT YOU BUT I DON’T HAVE TIME FOR THAT. WE ALMOST DIDN’T DO THE EPOXY GLAZE BUT NOW WE ARE BOTH ABSOLUTELY THRILLED WE DID. IT’S BEEN 6 MONTHS SINCE THE EXPERIMENTAL LAUNDRY ROOM COUNTER WITH THE POLY ON IT AND IT IS HIDEOUS. SO, THE LESSON HERE IS, DON’T USE POLY AND DON’T BE AFRAID OF EPOXY RESIN.
ALSO, ANOTHER FACTOR FOR ME PICKING THE EPOXY GLAZE ON TOP WAS THAT YOU CAN MAKE REPAIRS TO IT. POLY CAN’T BE REPAIRED B/C IT’S JUST LAYER UPON LAYER OF CLEAR COAT — THE LAYERS NEVER BOND TOGETHER. WITH THE EPOXY THEY DO BOND TOGETHER.
I cheated — I just did a cut and paste from something else that described everything I did, thus the caps. I also sanded, grippered, painted, glazed, sanded some more, and steel wooled the ugly cabinets. We changed the knobs, bought all new appliances, and put up a wainscoating backsplash — so that helped the whole look. Anyway, here are my after pictures –
The counters probably cost about $150 to do. The glass knobs were $50 at Hobby Lobby (1/2 off WOOHOO) — the knobs aren’t on the drawers in these pictures and the outlet covers were still off. The wood appliques we added to the cabinets by the sink were $10. The backsplash and trim were about $60. The paint was $25 for the cabinets and another $25 for the room.
Something i myself do have in my own room, is the feathers in a vase. You can soround the feathers with your favorite color of marbles. It adds some funk to your room.
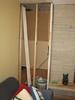
MY HOUSE WAS BUILT 40 YEARS AGO. THE KITCHEN CABINETS ARE TYPICAL OF THAT ERA, NOT ENOUGH STORAGE AND MUCH OF WHAT IS THERE IS INACESSIBLE.I CHECKED OUT THE PRICE OF PANTRY CABINETS AND THEY WERE WAY TOO HIGH, I LOVE TO SHOP FOR BARGINS AND THIS TIME I HEADED OFF TO MY HOME IMPROVEMENT STORE. I FOUND 2 TALL UNFINISHED CABINETS ON SALE. THEY WERE A DISCONTINUED MODELS. THEN I GOT THE STAINLESS STEEL PULL OUT SHELVES TO ADD TO THE EXISTING SHELVES. . I BOUGHT THESE A FEW AT A TIME AS THEY ARE EXPENSIVE.. I PLACED THE CABINETS SIDE BY SIDE AND REVERSED THE DOORS ON THE RIGHT HAND CABINET . THIS WAY YOU HAVE EASY ACESS TO BOTH CABINETS..
I AM GETTING READY FOR PHASE 2 ON THE CABINETS AND WILL LET YIU KNOW HOW IT TURNS OUT.
Disclaimer: MyFrugalLife.com cannot accept any responsibility for any injury or damage that you may cause to yourself, others, or property when following any advice given on this site. MyFrugalLife.com has no control of how you may use information you get from this site and does not attest to the validity of any information found within. Much of this information comes from third parties (newsletter readers and other contributers). Use advice found in our newsletters and on our site with common sense and at your own risk. If you see something in our newsletters or on our site that you disagree with, please let us know. Our goal is print only valuable information and advice.