| Showing 6 posts from March 2010 for this blog. |
~~~Computer Printing on Fabric for Quilts~~~
Wednesday, March 24, 2010
Computer Printing on Fabric
Computer and inkjet printer
muslin or any light colored 100% cotton
8 1/2” x 11” rectangles light colored fabric or muslin
8 1/2” x 11” rectangles of wax paper
Iron
scissors
If you haven’t tried printing on fabric now is the time to try, it’s a very simple process and anyone can do it.
I cut muslin and a piece of freezer paper the exact size of the copy paper 8.5 x 11 inches. For me the easiest way to do this is to lay my muslin over my ironing board then lay the wax side of a large piece of freezer paper down on top matching the edges as close as you can. Then using a hot iron press the two together. If you get bumps just lift the paper and press again. Then take your bonded muslin and paper to a flat surface and lay a piece of 8.5 x 11 copy paper on top. Using a ruler either draw around the copy paper and cut out through the bonded fabric and freezer paper or use your self healing mat, ruler and cutting wheel and cut out your sheets. You can use the paper several times but make sure the two layers are well bonded and there are no strings when you run them through your printer. Using your inkjet printer put the fabric side down one sheet at a time. Choose your picture and tell it to print, it is that simple. Don’t be discouraged if one has stray ink smudges on it once in a while, set that one aside and print another.
This process is fun for quilts, pillows panels to sew on purses, shirts or anything else you can think of.
1 Comments | Post Feedback |
|
~~~Seeds are ordered~~~
Wednesday, March 24, 2010
March 23 ~ ~ Now I officially am ready, ordered the seeds a couple of days ago, have the hubby on a compost run as I type. Spread the wood ashes around that we had dumped on the snow all winter hoping we hit the garden area, and yes we did hit the garden, thank you.
Looked at the cold frame, pondered, looked some more, hmmm, maybe I can get by another year without digging it out. But remember old girl you weren't real happy with the horse manure you got last year and the hubby did offer to get you some this year instead of you getting it. All you have to do is dig out the old and start with new so get with it, take his help when you get it silly.
Don't you hate it when you listen to those little devils when they cause you more work? In the long run it will be worth it and I will be glad I did so right after I get done here it's a digging I will go. The seeds should be here any day and we want to get them in the soil as soon as we can now. Our weather has made a turn and with our light bulbs in the cold frame and Mother Nature's help the seedlings should be sprouting in no time.
Oh by the way we have a new nephew Jaxson Danial Butcher was born March 22 to the hubby's neice Cari and Jason. They waited so long and had several miscarriages so this is a real Easter miracle for them.
Images:
0 Comments | Post Feedback |
|
Easter Bunny Cake
Wednesday, March 24, 2010
~~~Getting Kids Involved in Cooking~~~
Family get togethers are meant for making memories and sharing old ones. This certainly includes the young people in our families. Getting those young ones involved in the planning and cooking of meals is a step in making sure they will continue building family closeness in their own futures only if you make it fun. By letting them help choose the menu and then making or helping make some of items they build pride and confidence in themselves along with learning to cook.
Here are a few simple recipes and ideas to get those youngsters involved that have worked for us. Remember they are young, will make mistakes, but we did too and just because the end results may not be perfect EAT IT ANYWAY. Give them some leeway to express their creativity and learn.
Bunny Cake
A bunny cake is simple to make from a 9x13 cake. After you cool the cake freeze it for a few minutes to make it easier to handle. Cut 2x9 off one end for the two ears. You will cut this piece in half. Cut three 3 1/2" (you can adjust this size) triangle corners off the square you have left, put two together at the top forming a square for the head and one at the bottom of the square for a tail on the corner you didn't cut off, the ears on top of the head. Shape them as bunny ears; frost the whole thing with a fluffy white frosting and sprinkle with coconut if desired. Add a pink Jelly Bean for the eye and red licorice whiskers. Refer to the photo for placement and cutting lines.
You could use a smaller cake pan for the main body and put the rest of the batter in a small round pan for the head. Frosting hides a multitude of sins in the cake.
My Mother-in-law gave me this recipe and we all love it. A quick and easy salad my grandchildren like to make as well as eat –
Jell-O Fruit Salad
1 small package Jell-O any flavor strawberry is their fave
2 C sliced strawberries any fruit fresh or canned
2 C cool whip
2 C cottage cheese
2 C marshmallows
These amounts are all adjustable if I am short on something oh well, it is delicious anyway. Nuts are good also but one of our grands doesn’t like them so, you know we have to spoil the grands when we get the chance.
Refrigerator Muffins (feel free to cut the recipe in half if you wish)
3 Cups sugar 1 qt. Buttermilk
1 C shortening 4 eggs
5 tea b. soda 4 C All-Bran cereal
1 tea salt 2 C 100% bran
5 C flour 2 C boiling water
Pour Boiling water over 100% bran. Cream shortening and sugar, add eggs, buttermilk and 100% bran. Sift flour, salt and soda together. Add all together with All-Bran. Fold in only until moistened. Pour into greased muffin tins or muffin cups and bake 15 to 20 minute at 400 degrees. This batter will keep in refrigerator for 6 to 8 weeks. Keep batter covered. I use any bran cereal. When I want to use some batter I pour out how much I need and add slivered apples, raisins, dates, nuts or whatever I want before putting into the liners. For holidays use holiday colored liners.
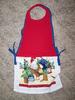
Child’s Apron
Supplies
1 hand towel
1 child’s tee shirt
Sewing machine
Bias tape
Cut hand towel in half, lay aside. Cut the top of apron according to picture using the neck opening for the neck of your apron. I chose to make a narrow shoulder but the picture shows a narrow and wide cutting line marked with a sharpie.
After cutting out the tee shirt top lay it out flat, align the half hand towel cut side next to the bottom of the tee shirt bottom. Gather the hand towel to match the width of the tee shirt. Stitch the hand towel to hold gathers. Pin the towel to the back of the tee shirt so you can sew on the hemline of the tee shirt and through the gathering stitching on your towel.
Fold your bias tape over the raw edges of the tee shirt starting where the towel and tee shirt join, stitch around to the other towel/tee shirt joint and cut even with the towel. Attach the same bias tape for the ties or use tie material of your choice.
Enjoy cooking with your little ones in their very own apron. Feel free to personalize with the child’s name or picture. My granddaughter and I love to cook together so I made this one for her.
Images:
0 Comments | Post Feedback |
|
Turn Junk Mail into Plantable Gifts
Sunday, March 21, 2010
Plant your Junk Mail
We all know the price of greeting cards! We all know the amount of junk mail we get every day, right? So why not solve both problems and make greeting cards out of the junk mail you say? Better yet lets make your greeting card a gift while you are at it. Lets put flower seeds in the paper so the receiver can plant the card and watch the gift grow. Here is how I do it.
Sort your paper carefully, no glossy paper will work, envelopes will work but be sure to remove the plastic windows and stay away from those advertisement inserts with all of the color. Remember when you mix several colors you usually get an ugly gray so sort, sort, sort! You can use food coloring to get a certain color. Copy paper from your own printer works great. If you really don’t care what the color is paper egg cartons work wonderful for pulp.
Materials you need- junk mail got any? Of course! By now you know what kind of paper you need.
Seeds of a variety easy to grow
Paper towel
Lots of newspaper
Picture frame apx. 14”x16” no larger, I made mine out of trim boards I had laying around
6” deep plastic tub that your frame will lay in with room for you to pick it up
Electric blender
Window screen
Stapler
The size of your frame will be the size of your paper sheets you have to work with when you are done. Staple the window screen over your frame. This needs to be very secure; I brought mine all the way around the frame and stapled it on the inside. Place your screen-covered frame in your tub with the flat side down.
Ok lets get our workspace ready, cover the table with several layers of newspaper. Have your paper towels handy and a towel, you could sure use rags or towels instead of paper towels if you have enough it takes quite a few. You can reuse the paper towels, I let them dry and use them again on my next batch, I have even been know to iron them during the process or hang them out to dry then store them in my tub with the screen until next time.
Tear your paper into shreds or run through a shredder if you are lucky enough to have one, fill your blender half way with your shredded paper and add around 2 cups warm water. Blend until you have the paper all ground into a pulp. Pour into your tub over your frame. You may need to adjust the amount of water according to your blender the amount will not hurt in the end. Repeat several times while you are in the mess you might as well make several sheets. Now is the time to decide on the color you want. If you want more than one color do one, rinse the tub and do another.
Now comes the fun part take hold of your frame and swish it around to remix the pulp and water evenly in the tub then slowly bring your frame straight up out of the mixture. Hold it over the tub until you can see if you have an even thin layer of pulp distributed over your frame, if not immerse it again swish and repeat until it is. When you are satisfied lay it over the edge of your frame. Sprinkle your seeds on your pulp quickly before all the water runs out, you can gently mist over your seeds if they don’t seem to be imbedded. You will get the hang of this step quickly don’t worry. With your flat hand carefully press the water out of the pulp. Now flip your frame over and carefully pop your paper pulp out on your paper towel covered newspaper by tapping on the corners first. If it tears and isn’t in large enough pieces to use just put it back in your tub and try again. Once it is out of the frame it should not be disturbed until it is fairly dry or it will tear so be sure you can leave it where it is several hours or overnight depending on how thick your paper is and much water you get out of it. You will have to experiment to learn how thick or thin you want your paper but the thinner the better for planting I feel. Normally if your paper wrinkles or curls on the edges press it flat with your iron; but for planting seeds I wouldn’t put the heat to it.
Well there you have the basics, how you make your card or gift of planting paper is up to you. I usually include a handmade packet of the same seeds I have imbedded in the paper with my card; I have found people don’t want to part with the handmade card. I have added a photo of one of my basic seed cards to my album for an example; all it needs is the message tag on the front and the packet of seeds inserted. This one has zinnia seeds in the pulp. You will notice this one is a dark green; I spray painted the paper with florist spray paint. The idea is that the recipient will tear the card up and plant the shreds but I have yet to find anyone that has parted with their card.
Images:
1 Comments | Post Feedback |
|
Seeds over plants, that is the question?
Saturday, March 20, 2010
Today is the first day of spring, YIPPEE, now if Mother Nature will just remember and no one upsets her this year. Here in Nebraska we have had our share of winter. It started early and continued to be cold and snowy all winter. The last decade has been so much warmer and so much less snow that we were beginning to think Mother Nature forgot where we were; well she woke up and remembered what she used to do to us. Even at that we were so fortunate compared to many other parts of the country. I for one am all for keeping her on our good side so be good to her I will!
Now with spring brings gardening and the yearnings to get my hands in the dirt. Last year I built a coldframe, I can’t say it was a total success but it did very well and I certainly was pleased with the money I saved. Overall we had the best garden we have ever had for several reasons. I will get into that later for now I want to encourage you to try starting your own plants. Whether you build a coldframe or not you can save so much starting your own plants over buying them. The nurseries have to make money to stay in business and that is to be expected, we can’t grow everything so we are glad. I love roses and I can’t start them, believe me I have tried starting with slips time after time and just can’t seem to get it right. So I buy them but I save planting everything I can.
Last year I grew everything in our garden and shared plants with several other families, this year with good luck I plan on selling some of my extra plants to a store also and paying for my seeds that way. I did have some trouble with shock on my tomatoes last year so this year I will transplant the seedlings when they are about 5” tall into pots I made from newspaper then later transplant right into their place in the garden when they are around a ready. I will post my pots on Thrifty Fun for those of you who may want to use them. I could have purchased peat pots but there goes some of my savings again and I have a friend who makes all of his own pots from newspaper with great success.
Another thing I learned last year was to hold down on the number of seeds I plant. I purchased good seed from mail order companies such as Gurneys and the quality is so much better that every seed must come up. Their seed is no more expensive and they have sales in every catalog, great quality of the seed and money back guarantee on everything that I can attest to they stand behind. The only trouble I had was on a grass plant I ordered, it wasn’t in the best shape when it came and then I had to be gone for a few days and forgot to plant it, when I got back it was beyond help. I contacted the company and they replaced it no questions asked even after I admitted I hadn’t watered the somewhat questionable plant.
The variety I grew last year was 4 kinds of tomatoes, 2 kinds of cucumbers, giant sunflowers, (see the photo of a squirrel sitting on one in my photo album) peas, beans, koli-rabi, 2 kinds of carrots, onions, beets, and 3 kinds of radishes, cabbage, broccoli and summer squash.
I have posted several pictures of last year’s garden to show you just how bountiful it was. We have a heavy black soil so we have added sand the last 4 years, compost the last two and a fertilizer made locally the last two. Our local sanitation department (trash pickup) makes compost and sells it for practically nothing. If you are planting grass sprinkle it on your area and then seed it, your grass will jump. My favorite way to break up a heavy soil is wood chips from a horse barn; that combination of horse manure and those wood chips is the best I have found to loosen up hard soil. Top that off with a load of sand and you have a soil that can’t be beat in my estimation. I use weed free grass clippings for mulch as deep as 6 to 8 inches. Friends are glad to have somewhere to go with their clippings and deliver it to me for nothing but I share my garden bounty with them and they love it.
This winter we have not had to purchase any vegetables other than fresh such as lettuce, tomatoes and radishes otherwise we are still eating from what was grown in my garden. Green beans are the one thing I don’t freeze, we prefer them canned but otherwise I freeze everything else. Of course we have canned tomato juice and stewed tomatoes, preserves from wild chokecherries and plums and apples from my tree. We have a horseradish patch and each year we have a “grinding” party where we put up around 100 pints of horseradish that we share with all. We get requests for it all year long and each year new people show up at the “grinding” party. There are lots of tears and laughing as the memories are made and the horseradish gets prepared for another year.
So as you can see I am really glad spring is here and I have an excuse to play in the dirt again. My seeds are ordered, my hubby is going after the manure and compost first of the week and aplanting I will go! You really should try it, it is so rewarding.
1 Comments | Post Feedback |
|
Denture Delimma
Friday, March 19, 2010
Well, I got my wish! I have perfect teeth, they aren’t real but they are real perfect!
As for my wish yes, years ago when my teeth were uneven, some discolored, the back ones missing; so when I tried to eat chips and other wonderful crunchy foods I got bit instead of the food, I wished desperately for a full set of beautiful “chompers”. Just can’t bring myself to say f----- teeth for some reason, after all they are for old people and no one in my family has had ever had any. Now I admit I have always been a teeny bit different than others in my family but even I have my limits. For the sake of my family, friends and all of you may I stay a teeny bit different if you haven’t been unfortunate enough to have gotten the same wish bestowed on your unsuspecting mouth. Now that's a Dental Delimma in my toothless opinion!
Anyone who knows me well will tell you my mouth has always gotten me into trouble from time to time and still does but never did it do anything so bad to deserve this treatment.
Okay, it’s a done deal; now deal with it, right? Right! What I really am wanting to do is share a little of what I have learned that may help any one that finds themselves facing this situation.
First of all there is food, we still have to eat like it or not and I mean like it or not. I do not like it and oh how I used to, now not liking it has been a good thing for I have lost a few pounds, which I am grateful for. As of yet Weight watchers hasn’t contacted me for my secret but I’ll keep a line open; and no I wouldn’t recommend this method.
Now I love soup of any kind, rice and yogurt. Then there are ice cream and malts of course and now I have an excuse to eat them without the guilt. With great pride and determination there has been no ice cream brought into this house since I have had the excuse, with no limitations I am afraid of what I might do. You’ve seen those movies with the distraught women digging in the ice cream bucket with their big ole’ spoon, well I am afraid I might by-pass the spoon and only come for air when I hit the bottom!
Right now my favorite piece of equipment in my kitchen is my 1-cup electric blender. It has become my new best friend and no longer is delegated to under the cabinet. Front and center for my friends. It us the main tool in my cooking these days and the reason I am still alive at all. It is said we should live and learn; well I am proof of that. I am alive and relearning how to prepare food and now would like to share some of my findings with you in case you ever find yourself in my predicament. One would not have to get your teeth pulled to enjoy these few recipes but they certainly are tried and true “chomper” recipes.
As for yogurt I am enjoying it often, my favorite way is crumbling a muffin, (one that I made with Malt-o-Meal cereal thinking it was a bread I could eat because it would be soft, wrong the cereal grains got under the plates and went to war) in a cereal bowl, cutting up mixed frozen fruit and topping with fat free vanilla yogurt and a touch of milk. Now that’s a treat.
Another favorite is shrimp salad served in a half avocado shell. This one I learned in Mexico and have adapted to work with tuna also. I boil my shrimp and run it through my one-cup electric blender along with the celery. I add the rest of the softer ingredients as one normally uses, mayo, relish, garlic salt and what ever you like. Clean the avocado and cram just as much shrimp salad as I can into it, piling it up in a nice mound. The other half of the avocado I slice and lay around the filled half, sprinkle with more garlic salt, wipe the saliva from my mouth as I grab my fork and hurry to sit down to enjoy my feast.
Not being one to ever like gravy on my potatoes, I know weird again, yes I like both just not together, give me rice any day. Off course one can’t make just a cup of rice, no I don’t like the instant, so I have a lot of the wonderful fluffy stuff to do something with. In our house the hubby eats potatoes only so I can do anything I want with the rice. A few ways I have found that appease the new “choppers” are buttered or heated with stewed tomatoes (sometimes a little salsa and parmesan cheese) or cheese melted over it and of course put in stew, a hubby pan and one for me of course.
The stew is all cut up really fine except the meat, which I run through my trusty little chopper just before serving so hubby has his chunky meat.
These recipes are of course not limited to the sore of mouth, aged, or sound of mind of which I am proof so feel free to try them. You don’t have to tell where you got them, no one will know.
Well if you are still with me, you may just be a chomper candidate someday if the need arises. We’ll hope the need does not indeed knock at your door. Remember to be careful what you wish, it might come true and you will pay for it with your mouth!
0 Comments | Post Feedback |
|
|