Deceptive Robo and Other Election Calls
Monday, November 06, 2006
With the midterm elections tomorrow there have been many reports of calls from computers pretending to be the other party, then calling back over and over with the same message.
There are also calls to try to get you to change your vote or telling you that your voting precinct has changed (when it hasn't). Just more political dirty tricks.
Your best bet is to not answer your phone until the election is over or only answer after you are sure it is someone you know.
Do please vote. You can call the your local political party of your choice and get a ride to the polls if you need one.
Susan from ThriftyFun
0 Comments | Post Feedback |
Dirty Political Ads
Monday, October 30, 2006
ThriftyFun has always been a place where we treat each other fairly and with respect. Because of this, it is a pleasant place to visit and although you may not find everyone will agree with you, at least their opposition is a respectful and kind difference of opinion.
I am personally boycotting "dirty" political ads. I switch the channel, mute the TV and definitely think twice about voting for the one that is advertising dirt on the other candidate. They are easy to recognize. The other candidate always looks grainy and the photos are awful. We are being inundated with them on TV, every night.
As long as they work, they'll continue doing them. Most are based on false or misleading information. With the internet, it is fairly easy to see who is behind the ads and also what the record of the candidate really is.
I'd much rather see ads about what the candidates actually stand for than dirt about the opposing candidate. Let's make our representatives accountable for their ads and do what we can to stop this kind of advertising.
If you also don't like seeing them, let the candidate know that you oppose this kind of advertising. Let's encourage mutual respect in our political system.
Susan from ThriftyFun
0 Comments | Post Feedback |
Getting Rid of Avocado Shag and Installing Hardwood Floors
Wednesday, August 16, 2006
Refurbishing My House - Step One - Replacing old carpet with hardwood - See pictures below
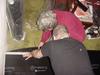
My house had avocado shag carpet from when it was built in 1977. It was shot! There were places that had to be covered with extra rugs because it had worn through. The den had avocado green vinyl. It was stained, scratched and worn. It is a really nice room with a fireplace but the flooring was dated and ugly. The hallway had a different kind of vinyl.
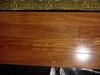
I'd wanted to replace it all with hardwood floors or Pergo. After looking at lots of different options, I decided that hardwood was a lot better deal in the long run. By the time I bought all of the Pergo stuff, the cost wasn't that much more for solid Brazilian Cherry which was 3/4 inch thick, 4 inch wide planks with 50 year finish guarantee.
Preparation:
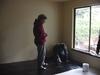
We wanted to paint and decided the best idea was to paint before we did the floor. We painted the walls and refinished the window sill and molding.
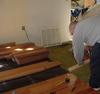
There is a 7 inch step up to the dining room of my house. That's where we started because it was a smaller room. We tore out the carpet, pad and staples. Because of some cat damage (bad cats!) in one of the corners, we painted the floor with shellac to seal the particle board that was under the carpet. We then laid down some foam underlayment. This is especially made for hardwood floors.
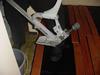
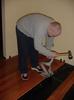
We rented a nailer from the local rental store but to be truthful, with the amount of time we needed the gun to complete the job, it probably would have been not much more expensive to buy one. That would help you finish it at your own speed. The plus to that is if it got jammed or had problems, they were great at getting it working again.
Installation:
There is a lot of good information online about hardwood floor installation. One important tip is letting the wood sit for a while before installation so the humidity of the boards can match the humidity of your area.
Figure out which direction to lay your floor. If this is your first wood floor installation, trying a fancy installation is probably not the best idea. The floor fits together with tongue and groove, the tongue side is the side that is nailed. The nailer nails at an angle. Another thing to keep in mind is that it takes at nearly a yard (36 inches) of space from the wall to have room to swing the hammer for the nailer. We bought a nail gun to do the face nailing. The face nailer that came with the other nailer messed up every board. Any boards that can't be nailed with the nailer need to be face nailed, meaning the nails will show.
The boards should go the opposite direction of your floor joists or beams so across them.
The boards should be lined up so that they don't all stop at the same point. They give you many lengths of boards in each box of flooring. A few will be 8 feet long but many more will be 6, 4, and 2 feet long. By carefully planning you can keep cutting to a minimum.
To saw hardwood, you need a good saw. We used a table saw and went through at least 2 blades.
We worked having two of us laying out boards for future rows, while the other nailed the boards. That way the nailing guy just needed to move them into place and keep going. Each board needs to be fitted by hitting the board by putting a 2x4 next to the board and hitting the 2x4 with a hammer or using a prybar to pull the board into place.
You will need spacers so that the flooring does not touch the walls, you need at least 1/2 inch between the wall and the first board. They make spacers for this. We bought a floor installation kit which had glue and spacers. The spacers can be moved as you move along but there needs to be a 1/2 inch space between the wood and the wall all the way around. This can be covered over with molding when the job is done and allows for expansion.
Probably the biggest mistake that we made was because we were working on a raised area the (7 inch step up), we learned that we should have started at the edge of the step rather than the wall so we would have a perfect edge. As it was we put a strip on the edge that covered it so you couldn't see the places that didn't quite match.
After we finished the dining room, we continued into the living room, the entry hall and the hall down to the bedrooms. Later we did the den, the front hall closet and linen closet floors. A year or so later we did one of the bedrooms.
Some things I learned:
- You need felt on the bottoms of all furniture so you don't scratch the floor.
- A lot of dirt is under a carpet that has been in place for 27 years. It really accumulates anywhere near the entry doors.
- The job really needs to be finished, molding, closets, doorways to look really professional.
- The color of the wood darkens after it has been in the room for a while. It takes about 6 months for it to get to it's potential best color (at least that's the case with the Brazilian Cherry.)
Finished Job:
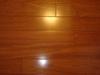
All in all it was a big job but really changed the character of the house. People always comment on the floors, how beautiful they are and are surprised that we installed them. I'm happy that we went with the hardwood.
Images:
7 Comments | Post Feedback |